How I Prepare for Backcountry Snowboarding in the Sierra Nevada
By Cap Puckhaber, Reno, Nevada
The Sierra Backcountry Snowboarding Guide
Backcountry snowboarding offers a silence that you simply won’t find at a crowded resort. I remember my first time heading out into the Sierra Nevada wilderness without a chairlift in sight. The physical demand of the climb changed my entire perspective on what it means to earn a descent. Because I spent years riding lift-served terrain, the transition to splitboarding felt like learning a completely different language. Despite the steep learning curve, the reward of untouched powder makes every drop of sweat worth the effort. I want to share how I prepare for these trips so you can stay safe while exploring the mountains.
The Mental Shift of Backcountry Riding
You have to accept that backcountry snowboarding is mostly about the uphill journey. Most of your day involves steady hiking through deep snow while carrying a heavy pack. I spent roughly ninety percent of my time climbing during my last tour near Lake Tahoe. This reality requires a specific mindset where you find joy in the rhythmic movement of the skin track. Because you are far from professional rescue teams, you must treat the mountain with total respect. I see many beginners rush into the woods without realizing how quickly conditions can change. For a deeper look at my lifestyle, check out my backcountry snowboarding guide for more details.
Digital Scouting with Google Maps
I start every trip by opening Google Maps to find viable parking and access points. I look for paved pullouts along Highway 50 or Highway 88 that the snowplows actually clear. Because satellite view shows the summer foliage, I can identify where the “tight” trees are versus open glades. I look for clearings that suggest a natural “drainage” or a wide ridge that allows for easier skinning. I avoid any area where the satellite shows massive boulder fields that might be hidden under thin early-season snow. This digital reconnaissance saves me from driving for hours only to find a locked gate or a wall of plowed snow.
Hunting for the Skin Track
I use the satellite layer to find the most efficient route through the lower timber. I look for old logging roads or summer hiking trails because they provide a flatter, more consistent base for my skins. Because skinning directly up a steep face is exhausting, I search for “benches” or natural steps in the terrain. I mark these potential “skin track” locations on my map before I even leave the house. I also look for creek crossings that might be impassable during a heavy spring runoff. This prevents me from getting stuck on the wrong side of a river at the end of a long day.
Identifying Technical Pitfalls
I look for “terrain traps” like narrow gullies or deep depressions where even a small slide could bury a rider deeply. Because these areas act like a funnel, I stay away from them whenever the avalanche danger is anything above low. I use the 3D tilt feature to see if my planned descent ends in a cliff or a thick “willow bash” at the bottom. I recommend finding an exit route that follows a ridge line rather than a creek bed. This ensures that I have a clear sightline and a safer path back to my truck.
Using Topographic Overlays for Safety
Topographic maps show the steepness of a slope through the spacing of contour lines. I look for lines that are close together because they indicate steep, potentially dangerous terrain. Because avalanches most commonly occur on slopes between thirty and forty-five degrees, I avoid those areas during high-danger days. I prefer using digital tools that color-code slope angles so I can visualize the safest route to the summit. I look for “green” or “yellow” zones on the map which indicate slopes under thirty degrees for my ascent. This step is non-negotiable for me because it helps me plan a path that stays on mellow ridges.
Avoiding the Danger Zone
I pay close attention to the thirty-eight-degree mark on my topo maps. Because this is the “statistical peak” for slab avalanche releases, I treat these slopes with extreme caution. I look for “low angle” alternatives that are nearby so I have a backup plan if the snow feels unstable. I avoid steep bowls that have large “convexities” where the slope suddenly gets steeper. These “roll-overs” are where the snowpack is often most stressed and likely to fail. I recommend staying on slopes that are under twenty-nine degrees if you see signs of instability like shooting cracks.
Planning My Descent Line
I look for a descent that offers a consistent pitch without forcing me to traverse across steep, loaded faces. Because traversing is difficult on a snowboard, I prefer “fall line” riding that keeps me out of the “hang fire” above. I use the contour lines to find “spines” or small ridges within the face that provide a safer high point. These ridges often have less snow, but they offer a much lower risk of being caught in a slide. I mark these “islands of safety” on my digital map so I can find them even in low visibility.
Analyzing Slope Aspect and Solar Heat
The direction a slope faces determines how much sun it receives throughout the day. I pay close attention to north-facing slopes in the Sierra because they often hold colder, better snow. However, south-facing slopes can become dangerous quickly when the afternoon sun hits them. Because the sun weakens the bonds between snow layers, I try to time my descents before the heat peaks. I always cross-reference my map data with current weather reports to see which aspects the wind has loaded with fresh snow.
Dealing with Solar Radiation
I look for “wet slide” activity on south-facing slopes as the temperature rises. Because the Sierra sun is incredibly intense, I often see “roller balls” or small pinwheels of snow on these aspects. These are early warning signs that the top layer of snow is losing its strength. I recommend moving to shaded, north-facing terrain once the snow starts feeling like “mashed potatoes” under your board. I also avoid slopes that sit directly under large rock faces that radiate heat into the snow. This “point release” hazard can trigger a much larger avalanche on the slope below.
Wind Loading and Aspect
I look at the recent wind direction to determine which slopes have “wind slabs” sitting on top. Because the Sierra crest often sees high-speed westerly winds, the east-facing slopes are frequently “loaded” with extra snow. I avoid these leeward slopes after a big storm because the extra weight makes them prime for a slide. I look for “scoured” or “wind-affected” snow on the windward side as a sign to stay away from the opposite face. I recommend sticking to the windward slopes if you are unsure about the stability of the leeward bowls.
Checking the Sierra Avalanche Center
I never step into the backcountry without reading the morning report from the Sierra Avalanche Center. This resource provides a detailed breakdown of current hazards and recent slide activity in our region. Because the report uses a standardized danger scale, I can quickly see if the risk is moderate or high. I look for specific mentions of persistent weak layers or wind slabs that might be hiding under the surface. This information dictates exactly where I choose to ride for the day. You can find these updates at the official Sierra Avalanche Center website before you head out.
Reading the Avalanche Problems
I look for the “Avalanche Problem” section to see what specific threat I am facing. Because a “Deep Persistent Slab” is much more dangerous than a “Dry Loose” avalanche, I adjust my terrain choice accordingly. I avoid any slope that matches the problematic aspect and elevation listed in the morning forecast. I look for the “Likelihood of Triggering” and the “Expected Size” of a potential slide. This allows me to decide if the “consequence” of a mistake is something I am willing to risk.
Utilizing Public Observations
I find the public observations section of the report incredibly helpful for real-world context. Other riders post photos and descriptions of what they saw on the snow during the previous day. Because these reports come from local experts, they provide a boots-on-the-ground view of the snowpack. I look for signs of “whumpfing” sounds or shooting cracks which indicate an unstable layer. I recommend contributing your own observations to help the community stay informed about changing Sierra conditions. To see what a real day in the mountains looks like for me, you can watch my snowboarding trip video at from a recent session.
The Essential Safety Trinity
I carry three items that I consider my lifeline whenever I am in avalanche terrain. My beacon, shovel, and probe never leave my body or my pack during a tour. Because these tools are useless if you don’t know how to use them, I practice with them regularly. I recommend taking an AIARE Level 1 course to learn the mechanics of a proper rescue. Based on my experience, the speed of your response determines the outcome of a burial situation. You should check the training resources at AIARE to find a class near you.
My Avalanche Transceiver
I use a modern three-antenna beacon that stays strapped to my torso under my outer layer. This device sends a signal that allows my partners to find me if I am buried. Because electronic interference can mess with the signal, I keep my phone and radio at least twenty centimeters away. I always perform a “beacon check” with my group at the trailhead to ensure everyone is transmitting. I never put my beacon in a backpack pocket because the pack could be ripped off during a slide.
The Collapsible Shovel
- I carry a metal avalanche shovel that fits inside the dedicated safety compartment of my backpack. Plastic shovels can snap in the cold or fail when hitting the dense debris of an avalanche. I make sure the handle is extendable so I can move large amounts of snow with less physical strain.
The Aluminum Probe
- A probe is a long, folding pole used to pinpoint the exact location of a buried person. I recommend a probe that is at least two hundred and eighty centimeters long for the deep Sierra snowpack. I practice deploying it quickly so I don’t fumbled with the locking mechanism during a high-stress emergency.
My Communication and Repair Gear
I frequently travel in areas where cell phone service is completely non-existent. Because of this, I carry a satellite messaging device that allows me to send an SOS signal if things go wrong. I also use two-way radios to stay in touch with my partners while we move through the trees. Clear communication prevents us from getting separated or accidentally dropping in on each other. I find that talking through our observations in real-time makes the group much safer as a whole.
The Satellite Messenger
I keep an InReach device clipped to my pack strap where it has a clear view of the sky. This tool lets me send text messages to my family so they know I am safe. Because it has a dedicated emergency button, I have a direct line to search and rescue teams. I also use it to check the weather forecast when I am deep in the wilderness. This peace of mind allows me to focus on the terrain instead of worrying about connectivity.
The Essential Repair Kit
- I never leave the trailhead without a small bag of tools and spare parts for my splitboard. My kit includes Voile straps, a multi-tool, and extra screws for my bindings because parts can rattle loose. These simple items have saved my day more than once when a climbing skin lost its stickiness. You can see my full gear setup in my backcountry gear video at for a visual guide.
Clothing and Layering Strategy
I follow a strict layering system to manage my body temperature while moving uphill. Because sweating leads to getting chilled once you stop, I try to “start cold” at the car. I wear a moisture-wicking base layer made of merino wool to keep my skin dry. As I heat up during the climb, I shed my mid-layers before I get soaked in perspiration. I always carry a large “puffy” down jacket in my pack for the summit transitions.
Managing Breathability
I prefer a hardshell jacket with large underarm vents for maximum airflow during the ascent. These zippers allow heat to escape without forcing me to take the jacket off entirely. Because the Sierra can be quite windy, I need a shell that blocks the gusts while letting my body breathe. I avoid heavy insulated jackets because they are too bulky and cause overheating on the skin track. My goal is to stay comfortably cool until I reach the top of the line.
Protecting Your Extremities
- I bring two pairs of gloves on every trip to ensure my hands stay warm and dry. I use thin liner gloves for the uphill hike because they offer better dexterity and breathability. Once I transition for the descent, I switch to waterproof insulated mittens to protect against the biting wind.
Food and Hydration Management
I pack significantly more water and calories than I think I will need for a standard day. Because the cold weather masks how much you are sweating, dehydration can sneak up on you quickly. I use an insulated water bottle instead of a hydration bladder to prevent the hose from freezing. I find that sipping small amounts frequently keeps my energy levels consistent throughout the afternoon. I also pack snacks that are easy to eat with gloves on, like energy bars or dried fruit.
High-Calorie Snacks
I prioritize foods that offer a mix of fast-acting sugars and long-lasting fats. I often bring a sandwich or a heavy burrito for a proper lunch at the summit. Because your body burns massive amounts of energy staying warm, you cannot afford to skip meals. I recommend salty snacks like nuts to help replenish the electrolytes you lose during the climb. My favorites include chocolate-covered espresso beans for a quick caffeine boost when the trail gets steep.
Preventing Frozen Water
I store my water bottle upside down in my pack because ice usually forms at the top first. This trick ensures that I can still unscrew the cap and drink even in sub-freezing temperatures. Because hydration is vital for clear decision-making, I never compromise on how much I carry. I avoid bringing glass containers because they are heavy and can shatter if dropped on frozen ground. I find that a simple liter of water with an electrolyte tab works best for me.
My Biggest Backcountry Mistake
I want to tell you about a time I let “summit fever” cloud my better judgment. A few seasons ago, I ignored a localized wind slab because I was so focused on reaching a specific peak. I saw the snow cracking near my feet but convinced myself it was a minor issue. Because I was lucky, nothing happened, but that moment haunted me for weeks. I realized that no descent is worth the risk of a preventable accident. Now, I am much more willing to turn around if the mountain doesn’t feel right.
Learning to Say No
The hardest skill to master in the backcountry is the ability to walk away from a line. I’ve had to cancel plans minutes before dropping in because the snow felt hollow or unstable. Because the mountain will always be there, I prioritize my long-term safety over a single run. I make sure my partners are on the same page before we even start our hike. We agree that anyone in the group has the power to veto a slope without being judged.
Trusting Your Intuition
I’ve learned to listen to that small voice in my head that says something is wrong. Often, your subconscious picks up on subtle clues like a change in snow texture or wind speed. Because your brain processes these signals based on past experiences, you should trust your gut. I recommend taking a moment of silence at the top of every run to assess the environment. If the vibe feels off, I simply find a safer way back down to the valley.
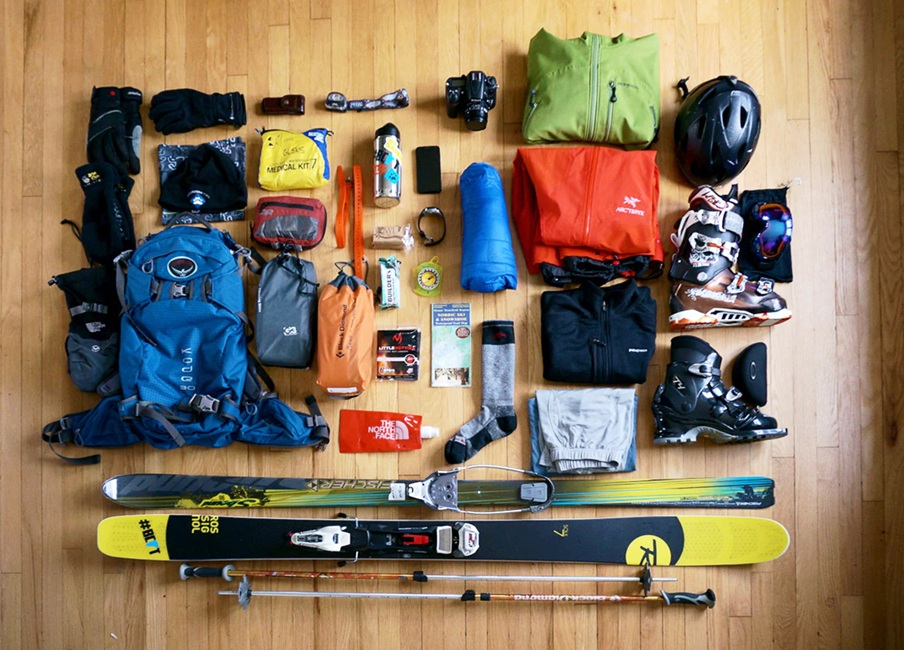
Final Preparations and Loading Up
I do a final gear check in my living room the night before every expedition. I lay everything out on the floor to visualize my pack and ensure I haven’t forgotten any small items. Because I hate rushing in the morning, I pre-load my board and boots into my truck. I also download my offline maps so I don’t have to worry about a poor data connection. This routine helps me start the day with a calm mind and a clear plan for the Sierra.
Frequently Asked Questions
What is the best way to learn how to use an avalanche beacon?
I recommend attending a local beacon park where you can practice finding buried transmitters in a controlled setting. You should also take a formal rescue clinic where instructors can critique your searching technique. Frequent practice with your regular partners is the only way to build the muscle memory needed for a real emergency.
Do I really need a splitboard or can I just use snowshoes?
I used snowshoes for my first few trips, but they are significantly less efficient than a splitboard. Snowshoes force you to carry the weight of your board on your back while you sink deeper into the powder. A splitboard allows you to glide across the surface of the snow which saves a massive amount of energy.
How do I find partners for backcountry snowboarding in the Sierra?
I recommend joining local splitboarding groups on social media or attending events at backcountry-specific shops. You should look for partners who have a similar risk tolerance and level of education as you do. I find that taking a course is one of the best ways to meet reliable people who take safety seriously.
What should I do if the avalanche report says the danger is high?
I strongly suggest staying out of the backcountry entirely when the danger rating is high. These conditions mean that natural and human-triggered avalanches are likely on many slopes. You can use these days to practice your beacon skills in a safe, flat meadow or stick to the resort boundaries.
How often should I replace my avalanche safety gear?
I check my transceiver for software updates every season and replace the batteries frequently. Manufacturers generally recommend replacing beacons every five to seven years because the internal components can degrade. I inspect my shovel and probe for any cracks or bent parts after every single tour.
Is it safe to go backcountry snowboarding alone?
I never recommend heading into avalanche terrain by yourself because there is no one to dig you out if things go wrong. Even a small slide can be fatal if you are pinned under the snow without assistance. Having a partner provides an extra set of eyes for terrain assessment and a lifeline during an accident.
Would you like me to help you map out a specific route for your next Sierra tour using these topographical rules?

Follow Cap Puckhaber on Social Media
- Connect with Cap Puckhaber on Facebook
- See Cap Puckhaber’s latest adventures on Instagram
- Read Cap Puckhaber’s thoughts on X
- Join the conversation on Threads
- Follow Cap Puckhaber on Mastodon
- Browse my Pins on Pinterest
- See my Hiking Articles on Medium
- Follow Cap Puckhaber’s Company Page on LinkedIn
- More Hiking and Snowboarding on BSKY
About the Author: Cap Puckhaber
Backpacker, Marketer, Investor, Blogger, Husband, Dog-Dad, Golfer, Snowboarder
Cap Puckhaber is a marketing strategist, finance writer, and outdoor enthusiast from Reno, Nevada. He writes across CapPuckhaber.com, TheHikingAdventures.com, SimpleFinanceBlog.com, and BlackDiamondMarketingSolutions.com.
Follow him for honest, real-world advice backed by 20+ years of experience.