
California Hiking Guide | Cap Puckhaber
Welcome to my California Hiking Trail Guide, which covers the John Muir Wilderness, Yosemite, Joshua Tree, Death Valley and more!
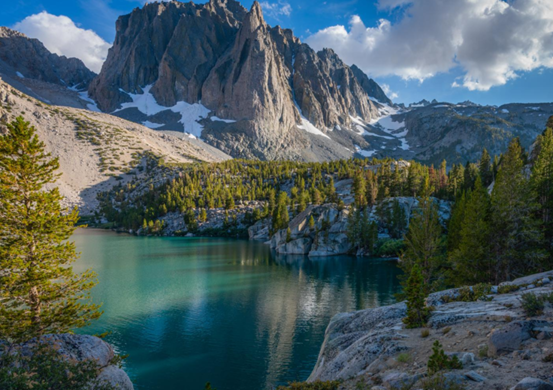
The Magic of the John Muir Wilderness
As digital preferences shift towards more minimalist and efficient web experiences, WordPress has responded by introducing an innovative feature: Hello, fellow adventurers! I want to share my passion for a truly remarkable place: the John Muir Wilderness. Nestled high in California’s Sierra Nevada, this area is a backpacker’s dream. It offers breathtaking granite peaks, clear alpine lakes, and vibrant meadows. It’s the perfect setting for a 2- to 3-night backcountry escape. I always find a sense of peace when I’m among these mountains.
The most common way to access this vast wilderness is from the Eastern Sierra. The gateway towns of Mammoth Lakes and Bishop provide multiple entry points. These trailheads, including North Lake, South Lake, and Mono Pass, are all conveniently located just off U.S. Highway 395. Finding these spots is quite easy. It is essential to remember that parking at these popular trailheads is extremely limited. I always recommend arriving very early in the morning or, even better, camping nearby the night before your hike to ensure a spot.
Permits and Planning Your Trip
A Note on Wilderness Permits
A wilderness permit is absolutely mandatory for any overnight backpacking trip. I always secure mine well in advance. These permits are available on Recreation.gov. Securing an advanced reservation is highly recommended, particularly for popular trailheads during the summer and early fall months. The permit specifies your exact trailhead, your planned entry and exit dates, and the size of your group. This system helps manage the number of people on the trails and protects the wilderness for all of us.
Popular Backpacking Routes
The John Muir Wilderness provides a variety of trails, suitable for different fitness levels. For a classic trip, the Piute Pass Loop is a fantastic option. This trail, which is roughly 25 to 30 miles long, starts at North Lake. It takes you through incredible alpine terrain with stunning views of the surrounding peaks. I love to camp by the crystal-clear waters of Piute Lake. The Bishop Pass to LeConte Canyon is another great route for those seeking more of a challenge. This 23- to 28-mile journey involves steep ascents but rewards you with picturesque meadows and pristine alpine lakes, with great camping near Boy Scout Lakes. For a more secluded experience, try the Mono Pass and Lamarck Col loop. This 20- to 25-mile trail offers rocky terrain and quiet camping spots in the expansive Evolution Basin. Another excellent option is the Little Lakes Valley trail, an easier out-and-back that offers spectacular views right from the start.
My Recommended Tips and Advice
Bear Safety and Camping
Bear protection is not optional; it is required throughout the John Muir Wilderness. A bear-resistant food canister is a mandatory piece of gear. These are designed to keep your food and scented items safe from bears. I always recommend placing your canister at least 100 yards away from your tent. You can rent bear canisters from many local gear shops and some visitor centers. For a good overview of approved canisters and rental locations, check out this guide from the National Park Service. This map from the JMT Wilderness Conservancy can also be a helpful visual aid for trip planning and navigation.
You must also adhere to Leave No Trace principles. Camp at least 200 feet from any water source and trails to minimize your impact. Excellent camping spots include Piute Lake, Evolution Basin, and Upper Boy Scout Lake.
The best time for backpacking in the John Muir Wilderness is typically late summer and early fall. During this period, the snow has largely melted, and the mosquito population has decreased significantly. It makes for a much more comfortable trip. Always carry a reliable water filter or purification system, as there are many streams and lakes, but the water is not safe to drink without treatment. A detailed map and compass are also essential for navigation, even if you are using a GPS.
A Desert Adventure: Exploring Death Valley National Park
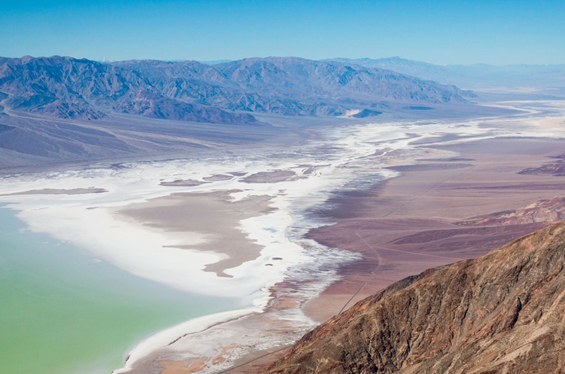
Death Valley National Park is a place of extremes. It is a stunning landscape, but it requires a deep level of respect. I have been hiking and backpacking through its canyons and across its salt flats for years, and each trip reminds me of the importance of preparation. The park is a true test of one’s ability to adapt and survive. My first time here was in the cooler months, which I highly recommend for anyone new to the area. I quickly learned that this isn’t a place you can just show up and wing it. The raw beauty of the landscapes, from the vibrant colors of Artists Drive to the otherworldly expanse of Badwater Basin, is unlike anything I have ever experienced.
I have found that the best time to visit is from late fall through early spring. This is when temperatures are much more manageable, allowing for full days of hiking. Summers here are not for hiking, with temperatures often soaring past 120°F. When I am planning a trip, my number one priority is checking the weather and the latest park alerts. Staying informed is the best way to ensure a safe and enjoyable adventure. I always check the official National Park Service website for the most current information. It is my go-to resource for conditions.
The Nuts and Bolts of a Death Valley Trip
Getting to Death Valley is relatively straightforward. Most visitors arrive via Highway 190, which bisects the park and connects to major cities like Las Vegas and Los Angeles. I typically enter through the east side from Las Vegas, heading directly to the Furnace Creek Visitor Center. It is a great place to get oriented and chat with park rangers. Parking is available at all major trailheads, but it is important to get there early during peak season. Some of the most popular spots fill up quickly, particularly on weekends.
For day hikes, you do not need a permit. Backpacking, however, is a different story. Backcountry camping is allowed and does not require a formal permit, but it is highly recommended to fill out a free voluntary permit at a ranger station. This allows the park service to know your itinerary in case of an emergency. One question I often get asked is about bear protection. Death Valley has no black bears or grizzlies, so you will not need a bear canister or bear spray. Instead, your focus should be on water, sun protection, and a reliable navigation system. You must carry at least one gallon of water per person per day. I often carry more.
Where I Camp and How to Do It
Camping in Death Valley provides a unique connection to the landscape. There are several developed campgrounds, with Furnace Creek and Stovepipe Wells being the largest. They offer amenities for both tents and RVs. If I want a more secluded experience, I head for the backcountry. This is where you can find true solitude and witness the most spectacular stargazing. Backcountry camping is permitted more than one mile from any road and at least 200 yards from any water source. You can find detailed regulations on the official NPS backcountry camping page.
My Top Recommendations for Trails
Death Valley offers something for every skill level, from easy, scenic walks to multi-day backpacking trips. I always recommend new hikers start with the well-trafficked trails. Golden Canyon is one of my personal favorites. This easy-to-moderate hike features beautiful, towering rock formations and is a great introduction to the park’s geology. The trail can be combined with Gower Gulch for a 4.5-mile loop. Another iconic trail is the Badwater Basin hike. This is an easy, mostly flat walk on a hardpacked salt crust. It is a surreal experience to stand at the lowest point in North America.
For those looking for a more strenuous challenge, I suggest Mosaic Canyon. The trail takes you through a polished marble canyon, offering unique natural sculptures. It is a moderate 4-mile roundtrip hike with some rock scrambling. Another great option is the Telescope Peak trail for experienced hikers. The trail is a challenging 14-mile roundtrip with significant elevation gain, leading to the highest point in the park. My advice is to always carry a detailed topographical map and a compass or GPS. You can find excellent maps on sites like AllTrails or the National Geographic Death Valley map. You should always be prepared to self-rescue
Hiking Dinkey Creek Wilderness: Fresno, California
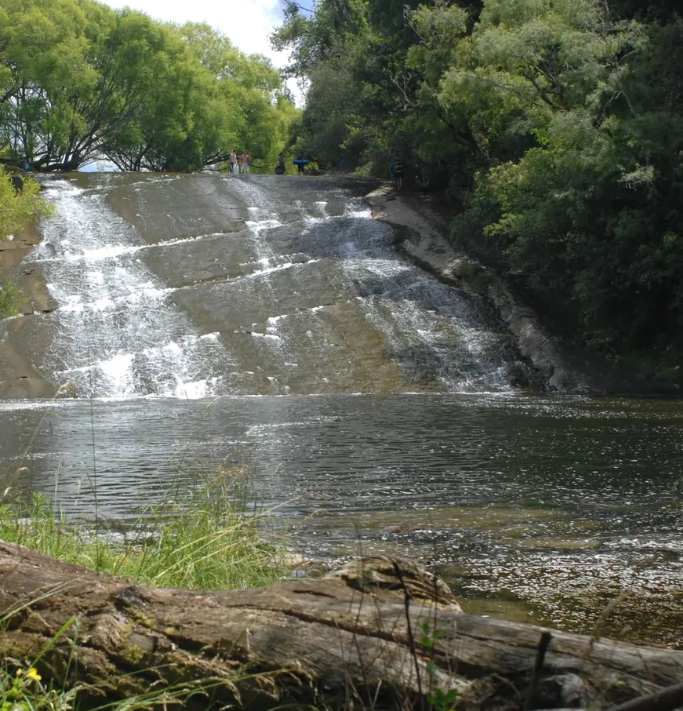
As an expert hiker and backpacker, I have been sharing my adventures for years on my blog, The Hiking Adventures. I’ve hiked all over California, but one of my favorite spots is the Dinkey Creek area. It’s a hidden gem in the Sierra National Forest near Fresno. Many people only know it for the popular water slides, but the true adventure lies in the backpacking trails beyond the day-use areas.
Overview of Dinkey Creek
I have spent many weekends exploring this beautiful corner of the Sierra. The Dinkey Creek area is known for its towering pines, cedars, and rugged granite terrain. The elevation here can vary dramatically, from the campgrounds around 6,000 feet to the high alpine lakes over 9,000 feet. This variety makes it ideal for a range of skill levels, from family campers to serious backpackers. The trails are generally accessible from mid-June to late October, depending on the snowpack. I have experienced snow here as late as July, so I always pack layers.
Details and Trail Information
Getting to the Dinkey Lakes Wilderness requires a bit of driving. From Fresno, I follow Highway 168 toward Shaver Lake. I then turn onto Dinkey Creek Road. This road is paved for a while but eventually turns into a dirt road. It is manageable for most cars, but a high-clearance vehicle is recommended for the final stretch to the trailhead.
Once you are there, you will find several different trails. A popular option is the Dinkey Lakes Trail, which offers a moderate hike. This trail is roughly two miles long. It’s a great option for a day hike or a short overnight trip. For a more challenging adventure, I recommend a lollipop loop that visits several alpine lakes, including First Dinkey Lake, Second Dinkey Lake, and Mystery Lake. This route is about 6-8 miles and has a moderate elevation gain of around 700 feet.
Another excellent backpacking route is the Cliff Lake to Helms Meadow Loop. It’s a beautiful 13-mile loop that takes me through meadows and past stunning granite features. It is a bit strenuous but well worth the effort for the amazing scenery. I have also explored the Three Sisters Peak Trail, which is an 11.4-mile out-and-back hike. It is considered a challenging route, but the views from the peak are truly magnificent. This trail provides a 360-degree panorama of the entire Dinkey Lakes Wilderness.
Permits and Regulations
When I plan a trip to Dinkey Creek, I always check the permit situation. Day-use permits are not required, but an overnight wilderness permit is mandatory for all backpacking trips into the Dinkey Lakes Wilderness. I get my permits online through Recreation.gov. A permit costs a small fee and is required year-round. It is important to remember that these permits are issued with a quota to protect the fragile ecology of the area. It is best to reserve a permit in advance, especially for popular weekends. A free campfire permit is required for any campfires or portable stoves outside of designated sites. I usually get one online from the Forest Service website.
Recommendations and Safety
I always make safety a top priority. Dinkey Creek is bear country, so I follow all food storage regulations. In the wilderness, this means using a bear canister or a proper counter-balance hang. This is especially important as I have heard stories of active bears in the area. I always store all food and scented items away from my tent, and never leave any food unattended.
For camping, the Dinkey Creek Campground is a great base camp with facilities, but I prefer backpacking into the wilderness to find a more secluded spot. The best camping is often found near the high alpine lakes like South Lake or Swede Lake. When setting up camp, I always follow Leave No Trace principles. This means camping at least 100 feet from lakes or streams, packing out all trash, and being mindful of my impact on the environment. I use a GPS app like Gaia GPS to navigate the trails and always download the maps before I go since cell service is nonexistent in this area. A physical map is also a must-have for me, especially when venturing on less-traveled routes.
Hiking to Matilija Falls: Ojai, California
The best time to visit Dinkey Creek is in the late summer or early fall. The weather is more stable and the crowds are smaller. I have found this to be the most peaceful time to go. It is always an amazing experience to be out there.
I love exploring the incredible trails in my home state of California. One of my favorite adventures is the hike to Matilija Falls, a beautiful and rugged trek near Ojai. This trail offers a perfect blend of challenging terrain and stunning scenery, making it a must-do for any avid hiker. The journey takes you deep into the Los Padres National Forest, a wild and beautiful part of California. As I hike, I always feel a profound sense of peace and connection with the natural world.
Overview of the Matilija Falls Hike
The Matilija Falls trail is an out-and-back route, about 5 miles round trip, though you can extend it. The path follows the Matilija Creek and provides a constant soundtrack of rushing water. This is not a maintained trail, so you will cross the creek several times. The total elevation gain is minimal, but the terrain is rugged. The trail’s difficulty is moderate, but it is best for those with some hiking experience. The falls are best viewed in late winter and spring, when water flows powerfully. I recommend visiting after a good rain.
Trail Details and Navigation
The trailhead is located at the end of Matilija Road. You can find it by searching for “Matilija Falls Trailhead.” There is a small parking area at the end of the paved road. No permits are required to hike this trail. You can find detailed maps of the area on the Los Padres National Forest website. I also use a GPS app like AllTrails or Gaia GPS to ensure I stay on the correct path. As you hike, you will notice the landscape change from chaparral to dense oak woodlands.
Creek Crossings and Trail Conditions
I always carry trekking poles on this hike because there are numerous creek crossings. Some are shallow rock hops, while others can be knee-deep, especially after heavy rain. It is a good idea to bring shoes you do not mind getting wet or a pair of water sandals for the crossings. The trail can be overgrown in sections, so long pants are a good idea. The last section of the trail is the most rugged. Scrambling is necessary to reach the base of the falls. You do not need to worry about bear protection in this area.
Camping and Extending Your Trip
While a day trip is a great option, I highly recommend backpacking and camping along the creek. There are several dispersed campsites just off the trail. You can find fire rings and flat spots near the water. The sound of the creek makes for a very restful night of sleep. Remember to practice Leave No Trace principles. There are no designated campsites or facilities. If you want a longer trip, you can continue past the falls. The Matilija Trail connects to other routes within the Los Padres National Forest. This offers a chance to create a longer loop or multi-day backpacking trip.
Best Time to Go and What to Bring
I find the best time to hike to Matilija Falls is between November and May. During this time, the water flow is at its peak, and the temperatures are comfortable. The summer months can be very hot, and the creek often dries up. Make sure to bring plenty of water, a filter for refilling from the creek, and some snacks. I always pack a small first aid kit and a headlamp. A camera is a must for capturing the beauty of the falls.
The Wild Beauty of Hetch Hetchy: Yosemite National Park
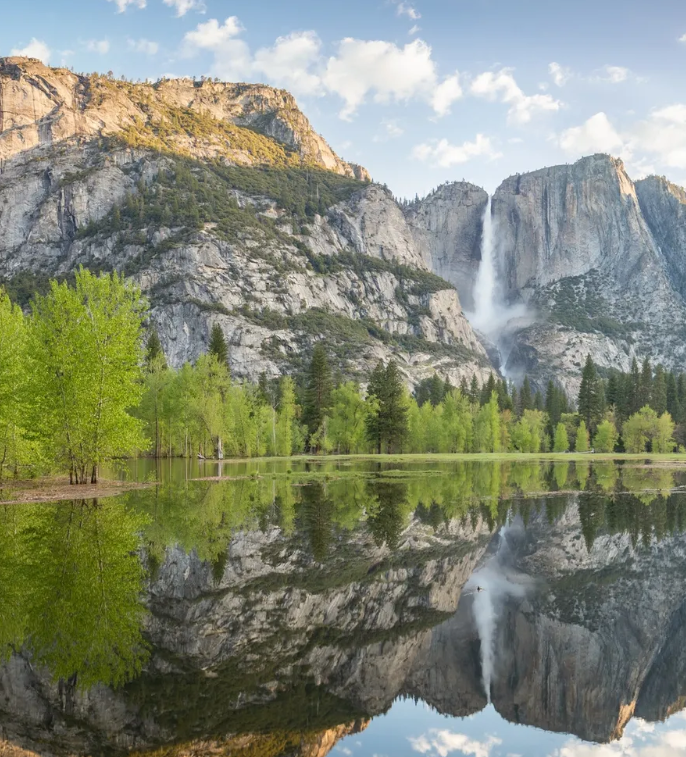
Hey fellow adventurers! Cap here, back with another dispatch from the trail. Recently, I had the distinct pleasure of revisiting a truly special corner of Yosemite National Park: Hetch Hetchy. Often overshadowed by its famous valley counterpart, Hetch Hetchy offers a raw, untamed beauty that any serious hiker or backpacker will deeply appreciate. If you’re looking for stunning scenery without the crowds, this is your spot.
Overview: Discovering Hetch Hetchy
For those unfamiliar, Hetch Hetchy Valley, while dammed to provide water for San Francisco, retains much of the grandeur that John Muir so eloquently described. Towering granite cliffs, cascading waterfalls, and serene reservoirs define the landscape. The hiking and backpacking opportunities here are diverse, ranging from easy strolls to challenging multi-day treks. I find the quieter atmosphere a significant draw; it allows for a more intimate connection with the Sierra Nevada wilderness.
Details: What to Expect on the Trail
My recent trip focused on a variation of the Hetch Hetchy Hiking Trail Loop, a fantastic option for experiencing the area’s highlights. The standard loop is around 13 miles, a moderate challenge that I highly recommend for those with some hiking under their belt.
Getting There and Permits
Reaching Hetch Hetchy is straightforward. From outside Yosemite’s western entrance, follow Highway 120 east and then turn north onto Hetch Hetchy Road. This road is generally open seasonally, so always check the Yosemite National Park website for current conditions. Parking is available at the O’Shaughnessy Dam, where the main trails begin.
For day hikes, no permits are required. However, if you plan to backpack and camp overnight in the wilderness, you will need a wilderness permit from the National Park Service. These can be reserved in advance through Recreation.gov. I always secure mine well in advance, especially for trips during peak season.
Trail Highlights and Terrain
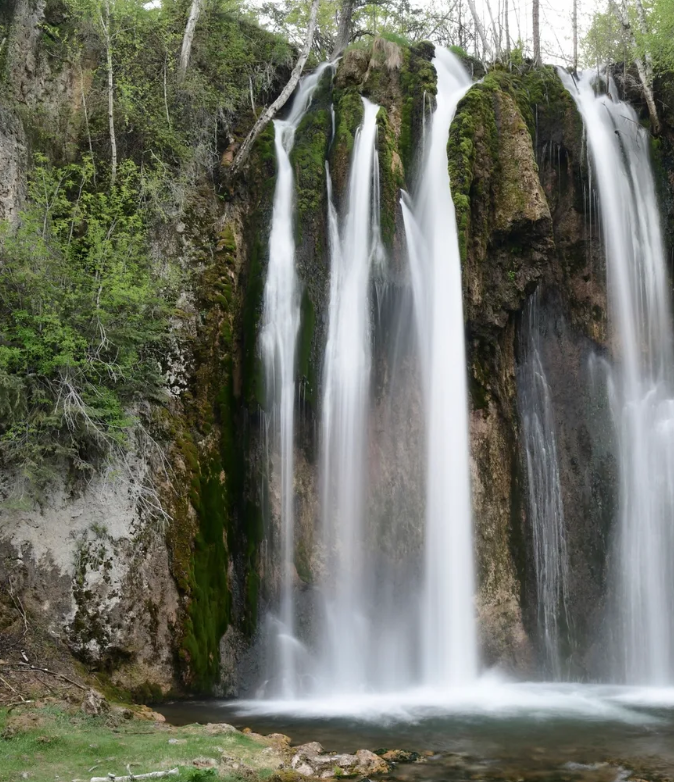
The loop typically begins by crossing the O’Shaughnessy Dam, offering impressive views of the reservoir and the surrounding granite formations. The trail then winds along the northern shore, treating you to spectacular vistas of Wapama Falls. In spring and early summer, the power of this waterfall is truly awe-inspiring. The path continues through a mix of forested sections, open rocky areas, and alongside the tranquil waters.
Expect varied terrain. There are some stretches of relatively flat, easy walking, but also sections with rocky underfooting and some moderate elevation changes. I always wear sturdy hiking boots with good ankle support. Several creek crossings are involved; depending on the time of year, these might require careful footing or even getting your feet wet.
Camping in Hetch Hetchy
For overnight trips, there are designated wilderness camping areas along the trails. These are typically first-come, first-served within permit zones. I prefer camping near Rancheria Falls; the sound of the cascading water is incredibly soothing. Remember to practice Leave No Trace principles: pack out everything you pack in, stay on established trails, and properly store your food.
Bear Safety
Yosemite is bear country, so taking precautions is crucial. I always carry a bear canister for food storage, as required by the park. It’s also wise to have bear spray readily accessible and know how to use it. Making noise while hiking can also help avoid surprising bears.
Recommendations: Planning Your Hetch Hetchy Adventure
Based on my experiences, here are a few recommendations to help you plan your trip:
Best Time to Go
Spring and early summer (May-June) are my favorite times to visit Hetch Hetchy. The waterfalls are at their peak flow, and the wildflowers are often in bloom. Fall (September-October) offers pleasant hiking temperatures and beautiful autumn colors, though the waterfalls may be reduced to a trickle. Summer can be hot, and winter often brings snow, which can make some trails impassable. Always check current trail conditions before heading out.
Trail Options Based on Your Preferences
- Easy Day Hike (up to 5 miles): Hike to Wapama Falls and back. This relatively flat trail offers stunning views of the reservoir and the impressive waterfall. You can find a trail map here: [Insert Link to Wapama Falls Trail Map if Available]
- Moderate Loop (10-15 miles): The Hetch Hetchy Trail Loop, as described earlier, provides a great overview of the area’s beauty. Consider adding a side trip to Tueeulala Falls for another spectacular waterfall view.
- Challenging Backpacking Trip (20+ miles): For a more extended adventure, explore trails heading deeper into the wilderness, such as the Rancheria Falls and beyond to Lake Vernon. This offers more solitude and challenging terrain. Consult detailed trail maps like those available from the Yosemite Conservancy for planning longer routes, paying close attention to elevation gain and terrain.
Essential Gear
Beyond the usual hiking essentials (water, snacks, navigation), I recommend:
- Sturdy hiking boots
- Water filter or purification tablets
- Bear canister and/or bear spray
- Sun protection (hat, sunglasses, sunscreen)
- Layers of clothing, as weather can change quickly
- A detailed map and compass (even if you use a GPS device)
Hetch Hetchy offers a unique and rewarding hiking and backpacking experience within Yosemite National Park. Its rugged beauty and relative tranquility make it a destination I return to time and again. So, pack your bags, lace up your boots, and come explore this hidden gem of the Sierra Nevada! You won’t be disappointed.
A Multi-Day Journey to Clouds Rest: Yosemite National Park
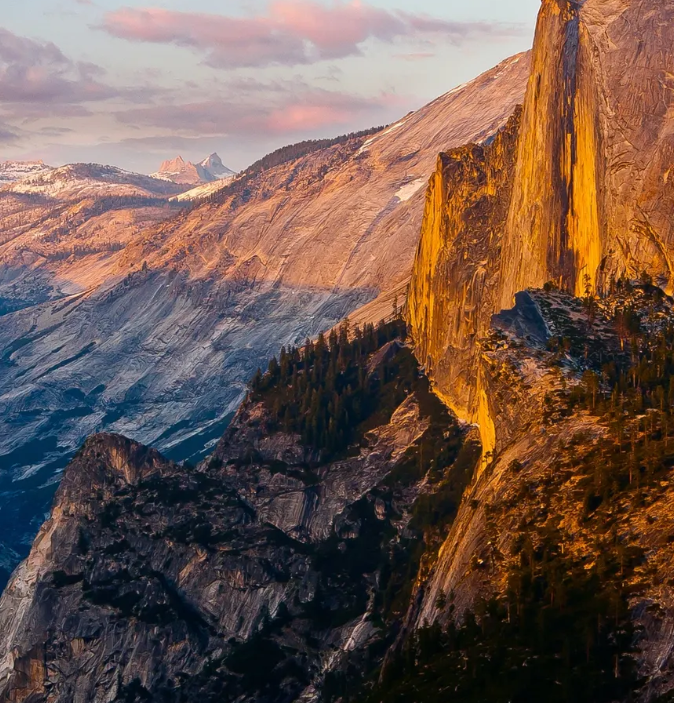
My most recent trip to Yosemite was a multi-day backpacking adventure. I wanted to experience a classic Yosemite backpacking route. The path I chose took me up some of the park’s most iconic trails, including Yosemite Falls and ending on the majestic Clouds Rest. This particular journey is a challenging but deeply rewarding experience. This trek covers a considerable distance, winding through different landscapes from shaded forests to exposed granite ridges. It’s an unforgettable way to truly immerse yourself in the Sierra Nevada’s beauty. I found it to be a perfect way to escape the crowds in the valley and connect with nature.
A Rewarding Hike: My Route and Tips
My route began in the heart of Yosemite Valley. From there, I started the climb toward Yosemite Falls. This steep ascent gave me incredible views of the valley floor and the immense scale of the falls. I hiked this section in late May. The water flow was magnificent, a roaring torrent of white foam cascading down the cliffs. After reaching the top of the falls, the trail leveled out slightly as I made my way deeper into the backcountry. I had secured a wilderness permit months in advance. You must have a permit for any overnight trip into the Yosemite wilderness. I reserved mine through the official Yosemite Wilderness Permit system. The permit system is competitive, so apply as early as possible.
A Classic Route Through Yosemite’s Backcountry
From Yosemite Falls, the trail eventually led me toward Tenaya Lake. This serene alpine lake is a perfect place to take a break and filter some water. The lake’s calm, clear waters reflect the surrounding granite peaks beautifully. Continuing from the lake, I hiked toward the final ascent to Clouds Rest. The last mile of this trail is an incredible experience. The views from the top of Clouds Rest are truly panoramic. You can see Half Dome, Yosemite Valley, and the entire high Sierra wilderness. This vantage point is higher than Half Dome itself. The feeling of standing there is unmatched. I recommend you pack a bear-resistant food canister for any overnight trips. It is a requirement for backpacking in Yosemite. This protects both you and the bears.
Preparing for Your Clouds Rest Trip
This is a multi-day trip for most people. Plan your itinerary based on your fitness level. My 45-mile loop took me three days. You could do it in four days. The terrain includes significant elevation gains and steep sections. I carried a topographic map and a compass. These are essential tools for navigating the trails. I also recommend a GPS device. You can find detailed maps of the Yosemite backcountry at the Yosemite Conservancy Map Store . The trail is usually snow-free from late June to early October. This is the best time to go. The summer is warm but thunderstorms can be common. The spring offers rushing waterfalls and wildflowers but may still have snow at higher elevations. Fall provides clear skies and fewer crowds.
Camping and Trail Options
There are several options for camping along this route. I found a few established backcountry campsites just before the final approach to Clouds Rest. You must camp at designated sites. This protects the environment. Parking is available at various trailheads in Yosemite Valley. The best spot depends on your exact start point. I parked near the Yosemite Falls trailhead. The parking lot filled up quickly. An early arrival is always best. Another popular trail to Clouds Rest is from Sunrise Lakes. This route is shorter. It is a good option for a weekend trip. From the Valley floor, the journey is longer. It makes for an epic backpacking trip. There are other loops that include Clouds Rest. A classic loop starts in Tuolumne Meadows, goes to Clouds Rest, then down into the valley. Then you return to Tuolumne on the John Muir Trail. This is a very challenging loop. It is for experienced backpackers only.
An Overview of My Joshua Tree Adventures
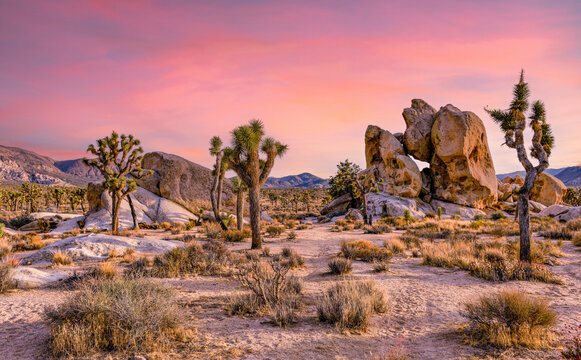
Joshua Tree National Park, located in southeastern California, is a true hiker’s paradise. It offers rugged terrain, stunning desert landscapes, and the iconic Joshua trees. The park features numerous trails, perfect for both casual hikes and challenging backpacking trips. Before you head out, however, it is essential to understand the rules and logistics. Proper planning ensures a safe and enjoyable adventure.
Navigating the vast, arid expanse of Joshua Tree National Park on foot is an experience like no other. I’ve had the pleasure of exploring this hiker’s paradise. The surreal landscape, with its bizarrely shaped Joshua trees and giant granite boulders, creates a unique sense of adventure. Whether you are seeking a short, scenic walk or a multi-day backpacking trek, Joshua Tree offers a memorable journey.
I’ve learned firsthand that the best time to visit is from October to May. During these months, temperatures are pleasant and ideal for hiking. Summer is brutally hot, with temperatures often exceeding 100 degrees Fahrenheit. If you must go in the summer, I recommend planning your hikes for the cooler hours of the day, such as sunrise or sunset.
The park is a designated wilderness area. It is important to remember that there are no bears here. So, you can leave your bear canister at home. You will still need to protect your food from smaller critters like squirrels and mice. I always use a critter-proof container or a sturdy food bag.
Hiking and Backpacking Details
Permits are crucial for any overnight trip. To backpack or camp overnight in the backcountry, you must obtain a permit. These are available online at Recreation.gov up to six months in advance. The fee is currently $6 per group. This permit allows you to stay up to 14 nights, with a maximum of three consecutive nights in one zone. Backcountry camping requires you to set up camp at least one mile from a trailhead, a half-mile from any road, and 200 feet from a trail.
Parking can be challenging, especially during peak season. Arrive early to secure a spot at popular trailheads. Alternatively, consider starting your trip from a less-used entrance. If you plan to leave your vehicle overnight, you must park at a designated backcountry trailhead. Leaving a car in a day-use lot or on the roadside is subject to fines or towing.
The Best Trails Based on Difficulty and Terrain
Joshua Tree has trails for every skill level. Here are a few of my favorites. For beginners, the Hidden Valley Nature Trail is a fantastic choice. This one-mile loop has only about 100 feet of elevation gain. It takes you through an enclosed rock valley. The trail is like a massive natural playground. The Barker Dam Nature Trail is another great option. This 1.3-mile loop is mostly flat. It explores a historic dam built for livestock and offers a good chance to see wildlife.
For a moderate challenge, I highly recommend the Ryan Mountain Trail. This 2.9-mile round trip hike has about 1,000 feet of elevation gain. It is a true workout. The effort is well worth it, as the summit provides incredible panoramic views of the entire park. The Fortynine Palms Oasis Trail is another moderate hike. It is a 3.1-mile round trip with about 636 feet of elevation gain. It leads to a lush fan palm oasis. Be prepared for a fully exposed trail with no shade.
For serious backpackers, the Boy Scout Trail is a must. This challenging 8-mile, one-way trail is popular for multi-day trips. It offers a varied landscape from rock formations to Joshua trees. Starting at the Boy Scout Trailhead, near Park Boulevard, is the best way to limit uphill travel. The trail ends near the Indian Cove Boy Scout Trailhead.
My Recommendations for a Successful Trip
I always recommend carrying more water than you think you need. Joshua Tree has limited water sources, and dehydration is a real risk. A hydration bladder is perfect for continuous sipping. I also suggest bringing salty snacks to replenish electrolytes lost from sweating.
Beyond the hikes, the camping opportunities are excellent. For car camping, Jumbo Rocks Campground is centrally located. It is an amazing spot with campsites nestled among giant boulders. Cottonwood Campground is another good choice. It is at a lower elevation, so it is warmer at night during the winter months. Remember, most campgrounds require reservations, which can be made on Recreation.gov.
Finally, for a complete backpacking experience, use a physical map in addition to a GPS. Cell reception is nonexistent in much of the park. A physical map can be a lifesaver. You can find excellent trail maps online, like the National Geographic Joshua Tree National Park Trail Map.
I’ve had countless amazing memories hiking and backpacking through Joshua Tree. With the right preparation, you can too. Don’t forget to leave no trace and protect the fragile desert environment.
More Blogs from Cap Puckhaber

Follow Cap Puckhaber on Social Media

Cap Puckhaber
Backpacker, Marketer, Investor, Blogger, Husband, Dog-Dad, Golfer, Snowboarder
Cap Puckhaber is a marketing strategist, finance writer, and outdoor enthusiast from Reno, Nevada. He writes across CapPuckhaber.com, TheHikingAdventures.com, SimpleFinanceBlog.com, and BlackDiamondMarketingSolutions.com.
Follow him for honest, real-world advice backed by 20+ years of experience.