
Oregon Hiking Guide | Cap Puckhaber
Welcome to my Oregon Hiking Trail Guide, which covers my trip to Three Sisters Oregon
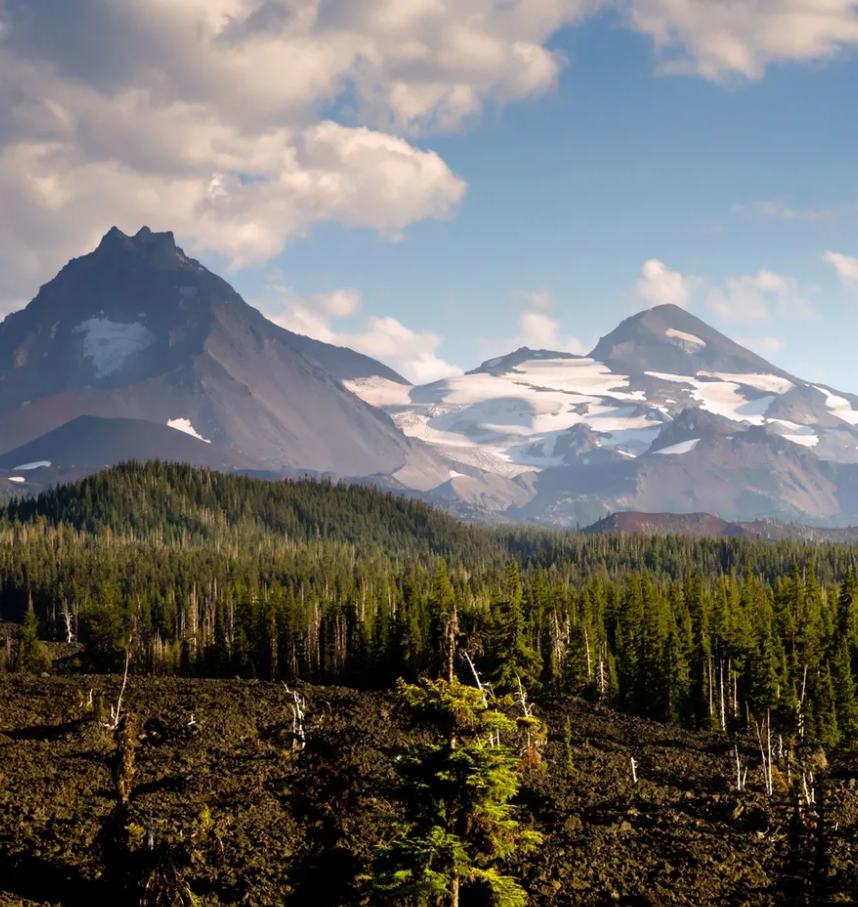
The Three Sisters Loop Trail in Central Oregon is a 50-mile journey through the Cascade Mountains that you absolutely must experience. This volcanic circuit surprised me with how challenging and how rewarding it really was. You’ve probably heard all the hype about the deep blue lakes and the wildflower meadows. That’s completely true. Still, this incredible hike demands serious preparation, especially if you’re newer to backpacking.
This piece is the honest, real-world rundown I’d give to a friend. We’re going to cover the confusing permit hustle, the unexpected dry sections, and the specific gear choices that genuinely saved my feet. The Three Sisters Wilderness is a spectacular place. Therefore, planning smartly means you can focus on the views instead of worrying about the logistics. Let’s get you ready to crush this phenomenal adventure for thehikingadventures.com.
Fifty Miles Is a Long Way, So Plan for Extra Days
The first thing to understand is the sheer size of this thing. The inner trail loops around North, Middle, and South Sister. It measures about 46 miles, but when you factor in the hike from whichever trailhead you use, you’re looking at a full trip closer to 50 miles total. That’s a huge distance for any trip. Consequently, you absolutely shouldn’t try to speed through it.
Because of this distance, I’m suggesting you ditch the idea of finishing in three days. That’s a brutal schedule for trail runners, not for someone who wants to enjoy a trip. A much better plan, particularly for beginner backpackers, is to aim for a four-to-six-day itinerary. This slower approach gives your body time to adapt to the rugged terrain and the inevitable elevation gain. I took five days for my trip, and that slower pace meant I could truly savor the experience. Furthermore, it allowed me to take an entire day for a side trip up South Sister.
You should know that the trail demands decent effort. You’ll gain between 6,000 and 10,000 feet of total elevation, depending on the side trips you add. The climbs are generally well-graded with switchbacks designed to avoid huge, steep pushes. Nonetheless, it’s a significant undertaking. The daily climbs might not look huge on a map—often just 500 to 700 feet at a time—but they just keep coming. Think of it like walking up the stairs of a 50-story building several times a day. Your legs will definitely feel it, especially after mile 12 each day. The trails are very well-maintained and clearly marked, which thankfully makes navigation simple. Still, always carry a physical map, like the National Geographic Trails Illustrated series, just in case your electronics fail.
Sorting Out the Permit Hustle Before You Go
Getting your permit is the biggest logistical obstacle to hiking the Three Sisters Loop. Seriously, don’t overlook this detail. The entire Central Cascades Wilderness Permit System is in place to protect the area from overuse, and you need a reservation for all overnight trips between June 15 and October 15. This isn’t optional; rangers check permits constantly, and the fines are steep.
You secure your permit for a specific trailhead on the Recreation.gov website. It’s a slightly complicated system because they release permits in two waves. The first batch goes out in April, known as the early-season lottery. The second, and more realistic chance for most people, is the release seven days in advance of your start date. They drop at 7:00 a.m. Pacific Time, and popular trailheads like Green Lakes or Obsidian are gone in minutes. Therefore, you need to set your alarm and be ready to click the moment they drop.
Even if your preferred starting point is booked, remember there are lots of other trailheads that feed onto the main loop. You just have to be willing to walk a few extra miles to reach the main circuit. The most important thing is securing that permit for any trailhead on your start date. Additionally, you will also need a Northwest Forest Pass to park your car at the trailhead. I made sure to display mine prominently. I did not want a ticket waiting for me after a long week of hiking. Planning the permit situation carefully means you respect the land and ensure you have a positive wilderness experience. You can find more specific rules regarding permits on the Official US Forest Service site.
The Best Time to Visit: My Late-Season Recommendation
Timing is truly crucial when planning a trip to the high Cascades. You’re navigating a narrow, two-month window between deep snow and heavy wildfire smoke.
I strongly recommend booking your trip for late August or early September. This time frame gives you the best chance of reliable, snow-free trails, which is great for new hikers who don’t want to worry about route finding over ice. If you try to go in June or early July, you’re practically guaranteed to hit large patches of snow, especially on the Pacific Crest Trail sections. I read lots of reports on Reddit where hikers struggled with that early-season snowpack. Sometimes you’re hiking over large drifts in dangerous fall zones, which just isn’t worth the risk.
The other major factor is the air quality. Fire season typically peaks from late July to early September. This means you must check current conditions before you leave home. I like checking trusted news and environment sites like Wildfire Smoke and Air Quality Map for up-to-the-minute smoke reports. If the air quality is bad, you should always have a backup plan ready. We once had to bail on a trip because the smoke was so thick it caused headaches. You can’t enjoy the views if you can’t breathe.
Then there are the insects. Mosquitoes are most intense in June and early July, particularly around still water sources like Matthieu Lakes. I found that by late August, the bug pressure was mostly gone. I treated all my clothes with Permethrin beforehand. Consequently, I had a much more pleasant experience than the people I met who were eaten alive earlier in the season. You should still carry some Picaridin for exposed skin, just in case you run into a particularly marshy area or a calm evening at a lake shore.
The Unspoken Truth: Pumice, Blisters, and Managing Microclimates
Let’s discuss the gear and the challenges that aren’t obvious from the trail guides. You’ll be walking on volcanic scree, sand, and pumice for a big portion of the trip. This terrain is brutal on your feet. It’s like walking through a massive quarry all day long.
My big secret for avoiding blisters was to use a simple preventative measure. I taped all my hot spots with Leukotape P before taking my first step. That tape held tight for five days, even after streams and long, dusty slogs, and my feet stayed miraculously intact. It’s a trick I learned from long-distance hikers, and it definitely saved me a lot of pain. I packed out zero blisters.
Also, you must protect your shoes from the grit. I highly recommend wearing lightweight ankle gaiters, like the ones from the Dirty Girl Gaiters brand. The fine pumice gets everywhere, and if you don’t stop it, that grit will rub your feet raw over fifty miles. You wouldn’t believe how many tiny stones I emptied out of my gaiters each evening, stones that would have otherwise worked their way into my socks.
Dealing with the Water Scarcity
The most stressful challenge was the water availability. While the area is known for lakes, there are surprisingly long, dry sections. I discovered that Alder Creek and Pole Creek were bone dry late in the season. This created a nine-mile, hot, and completely exposed water carry between Matthieu Lakes and Soap Creek. You must consult recent trip reports before you go.
You absolutely need a reliable filter. I carry a small, fast-flow filter and a backup purification method like tablets, just in case the filter fails or clogs with volcanic sediment. The water is cold and clean, but volcanic dust can clog filters rapidly. Always collect water where it’s flowing freely, if possible. Remember that carrying three or four liters of water is definitely better than risking dehydration on a sunny, shadeless stretch.
Microclimate Gear Check
The weather swings wildly here. I woke up one morning to a hard frost coating my tent, but by noon, I was sweating profusely in full sun. You need to pack smart layers. Your gear should include a puffy jacket for those cold early starts and evenings, a high-quality rain jacket that can handle wind, and lots of sun protection. Sunscreen, a wide-brimmed hat, and sunglasses are non-negotiable. The high elevation and the reflective pumice fields make sun exposure extreme. My friend forgot his hat and paid for it dearly with a blistering sunburn.
The Loop’s Two Personalities: Scars and Stunning Vistas
The 50-mile loop provides two very different hiking experiences on the north and south sides of the peaks. Both sections are beautiful, but they offer distinct geological and ecological personalities.
The North Side: Volcanic Wonders and Exposure
I loved the stark, otherworldly landscape of the northern section. This area is where you find the most unique geology. You walk right past immense fields of glossy, black Obsidian and traverse vast pumice flats near Opie Dildock Pass. You’ll even pass a small waterfall called Obsidian Falls. Furthermore, I spent an hour exploring the base of Collier Cone, marveling at the volcanic textures. It’s truly a magnificent landscape that makes you feel small.
However, this side contains the worst of the Pole Creek Fire burn scar. It’s a nine-mile section of silver snags with absolutely no shade. When the sun is out, it is absolutely relentless. I felt the heat dramatically here, and it really wore down my energy. If you hike this section in the middle of a hot summer day, you need to monitor your water and your energy levels very closely. The wind can also whip through this exposed section. You feel like you’re baking and blowing away at the same time. The sun reflecting off the pumice adds another layer of heat that’s just brutal.
The South Side: Alpine Green and High Traffic
The southern half is famous for its alpine meadows and pristine water features. This side is home to the stunning Green Lakes and Moraine Lake, which both offer unbelievable views of South Sister and Broken Top. The hike through the lush meadows south of Mesa Creek is truly gorgeous, too. You’ll see plenty of colorful wildflowers here, especially earlier in the season. You can even take a side trip to Demaris Lake, which is a lot quieter than the main lakes but equally beautiful.
The trade-off is that this section is also much more heavily trafficked. Since trailheads like Green Lakes are easily accessible, you’ll encounter a lot more day hikers on this half of the loop. This area is the “social hub” of the loop. If you want solitude, you’re less likely to find it here, particularly on weekends. Still, you absolutely should spend a morning at Green Lakes. The view of the peaks from the shore is unforgettable. I took about fifty pictures there, but none of them quite captured the scale of the mountains.
My Favorite Detour: Climbing South Sister
If you have the time and the energy, I highly recommend making the side trip to the South Sister Summit. I camped at Moraine Lake and got up early to make the climb. The view from 10,358 feet is amazing. You can see the whole Cascade Range—Mount Hood, Mount Jefferson, and the entire Three Sisters Wilderness spread out below you. It’s the ultimate panoramic payoff.
The trail is steep and involves a lot of loose rock, or scree, near the top. Your trekking poles are completely necessary for keeping your balance and protecting your knees on the way down. The sheer vertical push here is significant. REI sells very sturdy poles that many hikers depend on for this exact type of climbing. You can also detour up to Broken Top, which offers a completely different perspective, highlighting the jagged, glacier-carved features. Climbing up there felt less like a hike and more like a high-altitude scramble.
Staying on the Straight and Narrow: Ethics, Fires, and Human Waste
Because this trail is a highly popular destination, we, as backpackers, have a duty to keep it pristine. Following Leave No Trace (LNT) principles is non-negotiable here. This wilderness is fragile, and it needs our respect more than ever.
One of the most important rules is the fire ban. There is a strict no-fire regulation above 5,000 feet. This rule is in place because the area is highly prone to wildfires, and it minimizes the impact on high-elevation soil and ecosystems. This effectively means you cannot have a fire at the popular lake camps like Green Lakes or Moraine Lake. I made sure my backpacking stove was in good working order because I was relying on it completely for hot meals. You should always carry a fire pan if you plan to build a fire below that elevation, but it’s best to stick to your stove.
Furthermore, waste management is critical. Since this area is so heavily used, burying human waste might not be sufficient in high-traffic zones. You should carry WAG bags or another human waste disposal system if you plan to camp near popular lakes. Always pack out all your trash, including food scraps. That orange peel you leave behind might seem small, but it takes years to decompose in an alpine environment. Also, you must secure your food from animals. Mice and chipmunks are incredibly persistent, and they will chew right through your tent or backpack if they smell dinner. A proper bear canister or a counter-balance hang is absolutely necessary.
I had a great chat with a PCT thru-hiker who emphasized that being a good steward of the land is part of the adventure. He said treating the wilderness well means treating yourself well, too. That really stuck with me.
Final Thoughts and Your Next Step
Finishing the Three Sisters Loop was one of the most satisfying experiences of my backpacking life. It gives you a profound sense of the Oregon wilderness—the raw power of the volcanoes, the delicate beauty of the meadows, and the quiet resilience of the burn scar.
I know the 50-mile distance can feel intimidating, especially for a beginner. However, trust me when I say that the challenges—the dry stretches, the pumice fields, the early starts to beat the heat—only make the high points sweeter. When you see Middle Sister reflecting perfectly in a still alpine lake, or the entire Cascade skyline from South Sister’s summit, all that hard work melts away. That immense feeling of accomplishment stays with you long after the hike is over.
Your next step is simple. Go get those permits secured on Recreation.gov website, buy those gaiters, and start training those legs. This is an incredible journey waiting for you. Come visit our site, thehikingadventures.com, for more detailed gear reviews and trail guides so you can make your dream hike a reality! You absolutely can do this.
More Blogs from Cap Puckhaber

Follow Cap Puckhaber on Social Media

Cap Puckhaber
Backpacker, Marketer, Investor, Blogger, Husband, Dog-Dad, Golfer, Snowboarder
Cap Puckhaber is a marketing strategist, finance writer, and outdoor enthusiast from Reno, Nevada. He writes across CapPuckhaber.com, TheHikingAdventures.com, SimpleFinanceBlog.com, and BlackDiamondMarketingSolutions.com.
Follow him for honest, real-world advice backed by 20+ years of experience.