

A Plan for Gear, Snow Hiking, and Ice Axe Safety
By Cap Puckhaber, Reno, Nevada
I’ll never forget my first “spring” hiking trip in the Sierra Nevada. I’m Cap Puckhaber, a marketing pro and part-time blogger, but that day I was just an over-confident outdoor enthusiast. I figured it was late April, so I almost left my ice axe in the car to save weight. Thank goodness I didn’t. That “spring” trail quickly turned into a steep, icy traverse that would have been a one-way ticket down the mountain without the right gear. That experience taught me a hard lesson: hiking in snow and ice isn’t just “winter” camping. It’s a completely different beast that demands respect, the right equipment, and real skills.
Winter camping and spring snow hiking can be absolutely magical. You get serene landscapes, solitude, and a unique challenge that summer hiking just doesn’t offer. But staying safe, warm, and comfortable in snow and freezing temperatures requires a specific set of gear and knowledge. I’ve consolidated everything I’ve learned from my own trips, my mistakes, and my research into this one comprehensive guide. We’ll cover my must-have gear, how to actually use the technical tools, and the planning steps I never, ever skip.
My Lived Experience: Why Snow Hiking is No Joke
A lot of people, especially on forums like Reddit, ask if they really need all the expensive winter gear. The short answer is yes. Your three-season setup won’t cut it when the temperature drops and the snow starts to fall. I learned this the hard way on a trip in the Western US a few years back when I thought my 20-degree bag and my lightweight tent would be “good enough.” I spent the entire night shivering, unable to sleep, and dangerously cold. That trip was miserable, and I realized that in winter conditions, “good enough” is just another way of saying “unprepared.”
The ground doesn’t just get cold; it actively sucks the heat right out of your body. The wind doesn’t just blow; it cuts through thin tent fabric like a knife. And a simple slip on an icy trail isn’t just a tumble; it can be a high-speed, uncontrollable slide. This is why investing in the right winter camping gear isn’t about luxury. It’s about survival and being able to actually enjoy the experience. You’re building a life-support system, and every piece has a critical job.
What is a Four-Season Tent?
First, let’s talk about shelter. A true four-season tent is your absolute must-have for winter camping. These tents are specifically engineered to handle snow, high winds, and cold. They use stronger poles and heavier fabrics than your typical summer tent. Their low-profile, dome-like designs are made to resist wind and, most importantly, prevent heavy snow from piling up and collapsing the structure. I’ve woken up to a foot of fresh powder on my tent, and I was deeply grateful for that robust frame.
The MSR Access 2 is a fantastic example. It’s a popular choice because it’s relatively lightweight for a four-season tent, but it’s still a durable beast. It has that strong pole geometry I mentioned and a full-coverage rainfly. This fly goes all the way to the ground, which is critical for blocking wind and snowdrift. A three-season tent with a high-cut fly will just let snow blow right into your living space.
The Foundation: Your Sleep System
Your tent is only half the battle. Your sleep system—your bag, pad, and liner—is what actually keeps you warm. I cannot overstate this. You’ll lose most of your body heat to the cold ground, not the air. That’s why your sleeping pad is arguably more important than your sleeping bag. You need a pad with a high “R-value,” which measures its resistance to heat flow. For winter, you need an R-value of at least 5, but I aim for 6 or higher.
The Therm-a-Rest NeoAir XTherm is my go-to pad for this reason. It has a massive R-value of 6.9, which is incredible for how lightweight and packable it is. It uses reflective layers inside to trap your body heat. I’ve used cheaper pads and felt the cold seeping in from the ground within an hour. The XTherm creates a legitimate barrier.
The Core Gear You Absolutely Can’t Skimp On
Now that we’ve covered the big two, let’s get into the rest of my essential winter camping gear list. This is the gear I’ve tested and trust. I’ve included the specific brands I use because when it comes to winter backpacking, brand reputation and proven performance matter.
Staying Warm: The Sleeping Bag and Liner
For your sleeping bag, you need a rating that’s significantly lower than the coldest temperature you expect. I recommend a bag rated to at least -20°F for serious winter camping. The Marmot Col -20°F is a furnace. It’s filled with high-quality down insulation that traps warmth with incredible efficiency. It also has features like a waterproof shell, which helps protect the down from tent condensation, and an insulated draft collar around your neck to stop precious heat from escaping.
But here’s a pro tip: add a sleeping bag liner. I always bring my Sea to Summit Reactor Extreme. It’s a lightweight, fleecy sleeve that slides inside your sleeping bag. It’s made from Thermolite fabric and can genuinely add up to 25°F of warmth. On nights that were colder than forecasted, this liner was the difference between a restless shiver and a solid night’s sleep. It’s a small item that makes a huge impact.
Your ‘On-Body’ System: Clothing and Boots
Let’s talk about what you wear. Layering is the absolute key to comfort. Your clothing system has three parts. You start with a moisture-wicking base layer (think wool or synthetics, never cotton) to pull sweat off your skin. Then, you add an insulating layer, like a fleece or a down puffy jacket, to retain heat. Finally, you have a waterproof and breathable outer layer (a shell) to protect you from wind and snow.
For my feet, I don’t mess around. Wet, cold feet are a fast track to hypothermia and misery. The Sorel Caribou Boots are a classic for a reason. They have a completely waterproof rubber shell, a durable leather upper, and a thick, removable felt liner for serious insulation. They’re heavy, for sure, but they are built for standing around in snow and subzero temperatures.
For my main winter jacket, I use the Arc’teryx Camosun Parka. It’s a perfect example of a great outer layer because it combines two jobs in one. It has a fully windproof and waterproof GORE-TEX shell on the outside, but it’s also packed with high-quality down insulation on the inside. This setup provides a ton of warmth without making you look like a marshmallow, and it shields you from any weather.
Camp Life Essentials: Stove, Light, and Water
Cooking in the cold presents its own challenges. Canister stoves can lose pressure and fail in freezing temperatures. That’s why I like the Jetboil MightyMo stove. It’s compact, efficient, and has a regulator that helps it perform better in the cold. It also has a push-button igniter, which is a lifesaver when your fingers are numb and you can’t feel a lighter. Its main job is to boil water fast, which is all I need for rehydrating meals and making hot drinks.
With shorter days, a reliable headlamp is non-negotiable. You’ll be setting up or breaking down camp in the dark. The Black Diamond Spot 400 is my pick. It’s bright, waterproof, and has a long-lasting battery. I always carry extra batteries, and I keep them in an inside pocket close to my body. Cold temperatures can kill batteries in a hurry.
Finally, hydration. It’s easy to forget to drink when it’s cold, but you’re still losing water through breathing and sweat. Dehydration is a serious risk. The problem is that your water will freeze. I carry a Hydro Flask 32oz Wide Mouth bottle. Its double-wall insulation keeps my water from turning into a block of ice. A pro tip is to store your bottle upside down in your pack. Since water freezes from the top down, this keeps the lid and threads from freezing solid.
Beyond the Basics: Navigating Ice and Snow Safely
Having the right camp gear gets you through the night. But having the right travel gear is what gets you to camp and back safely. This is where many hikers, especially in the spring, make critical mistakes. They see snow and think “snowshoes,” but they don’t think about the type of snow. Hard, icy, and sloped terrain is where things get dangerous, and that’s when you need more than just boots.
A study on hiking injuries found that winter hiking injuries account for approximately 15% of the annual total, with many being falls on icy trails. This isn’t surprising. A sloped trail that’s just dirt in the summer becomes a serious hazard when covered in slick, packed snow.
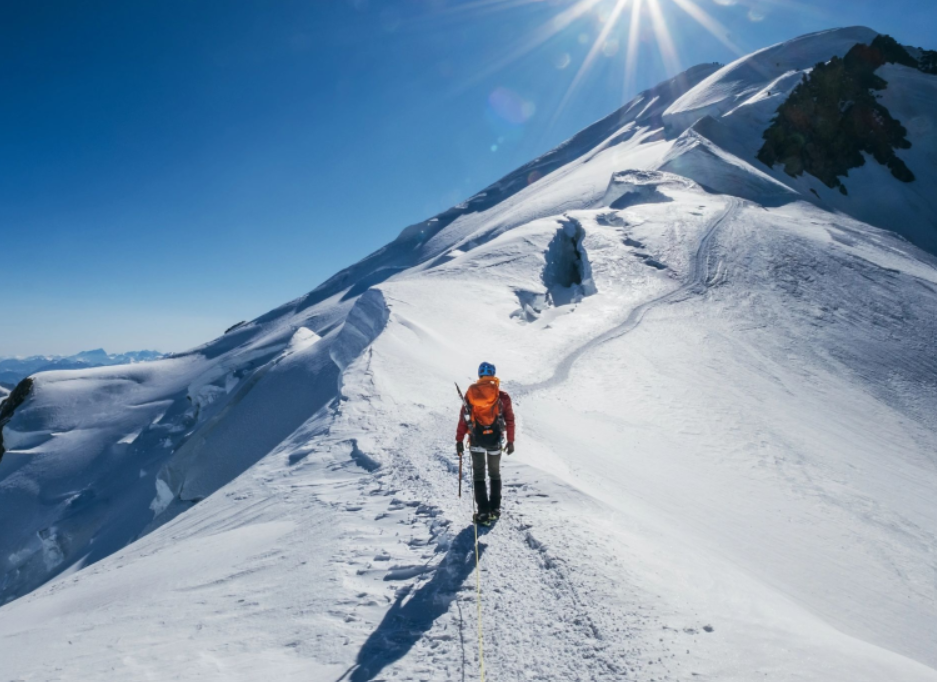
The Most Important Tool: Your Ice Axe
This brings me back to my Sierra story. An ice axe is the single most important tool for hiking on steep, snowy trails. It is not a glorified walking stick. It’s your brake. It’s the tool that can stop a fall and let you self-arrest if you slip. When you’re section hiking the PCT in the spring or tackling any alpine summit, an ice axe is essential.
I recommend a lightweight trekking or mountaineering ice axe, not a technical ice climbing tool. The Salewa Alpine X is a great example. It balances weight and performance perfectly for snow-covered trails. When you’re looking for the best ice axe for PCT hikers, you want something light enough to carry for miles but with a solid steel pick that will bite into hard snow when you need it to.
How to Actually Use an Ice Axe (And Not Just Carry It)
Carrying an ice axe on your pack looks cool, but it’s useless there. You need it in your hand, ready to use, before you get to the dangerous section. And you absolutely must practice how to use it. Please, don’t let your first time trying to self-arrest be when you’re sliding down a mountain. Go to a safe, snowy hill with a clear run-out (no rocks or trees) and practice.
The two fundamental skills are the self-belay and the self-arrest. The self-belay is using the axe as a cane on the uphill side of your body. You plant the spike with every step, giving you a third point of contact. If you slip, your weight is already on the axe. The self-arrest is the emergency stop. It’s a violent, practiced motion where you roll onto your stomach, face uphill, and drive the pick of the axe into the snow at your shoulder, using your body weight and a strong grip on the shaft to stop your slide.
You can find excellent tutorials online, like this detailed guide on how to use an ice axe from REI. Read it, watch videos, and then practice it yourself.
What About Crampons and Snowshoes?
An ice axe is for stopping a slip. Crampons and microspikes are for preventing the slip. Microspikes are great for flat or low-angle icy trails. But for steep, hard-packed snow, you need full crampons. These are metal frames with aggressive spikes that strap to your boots. They give you incredible traction.
Snowshoes are for a completely different condition: deep, soft, powdery snow. They work by distributing your weight over a larger area so you “float” on top of the snow instead of sinking in up to your hips with every step (we call that “postholing,” and it’s exhausting). The MSR Lightning Ascent snowshoes are a gold standard for backcountry exploration. They have an aggressive traction system around the frame, which gives you a good grip, and the bindings are easy to adjust even with gloves on.
Trekking Poles are Your Best Friends
On any terrain that’s not steep enough to require an ice axe in hand, I’m using my trekking poles. They are a must-have for balance and stability on slippery terrain. The key for winter hiking is to attach “snow baskets” to the ends. These are wide plastic discs that stop your poles from sinking deep into the snow. They make a huge difference and save you a ton of energy.
My Pre-Trip Ritual: Planning & Safety Checks
You can have the best gear in the world, but it won’t save you if you’re in the wrong place at the wrong time. Winter backpacking in the Western United States, from the Cascades to the Rockies, means you are in avalanche territory. Your preparation is your first line of defense.
Always Check Conditions (No, Really)
Before I even start packing, I am obsessive about checking trail conditions and the weather forecast. I look at mountain-specific forecasts, not just the forecast for the nearest town. I check snow depths and, most importantly, the avalanche risk. Websites like AllTrails are a good start for recent trip reports, but your local avalanche center is the official source. You can find your regional center’s forecast at avalanche.org, which is the hub for the US. Their forecasts are incredibly detailed and will tell you why the danger is high or low.
I also check the official park website. The National Park Service posts critical updates on trail closures, road status, and specific winter hazards. Their winter safety guides are a great, no-nonsense resource for planning.
The Avalanche Question: Beacons, Shovels, and Probes
If you are going into mountainous terrain with significant snow, you must carry an avalanche safety kit. This is not optional. The kit contains three items: an avalanche beacon (or transceiver), a shovel, and a probe. The beacon transmits a signal so your partners can find you if you’re buried, and it can be switched to receive to find them. The probe is a long, collapsible pole for pinpointing someone under the snow. The shovel is for digging them out.
But here’s the most important part: this gear is useless if you don’t know how to use it. You and everyone in your group must be trained. Take an avalanche safety course (an Avy 1). Learn how to read avalanche terrain, how to make smart decisions, and how to perform a rescue. Your life and your friends’ lives depend on it.
Don’t Be a Statistic: Emergency Prep
Winter conditions are unforgiving, and the margin for error is razor-thin. You have to be prepared for an emergency. I always pack a comprehensive first-aid kit that’s beefed up for winter (extra hand warmers, emergency blanket), carry fire-starting materials in a waterproof bag, and I also bring a portable charger for my phone and GPS.
The most important safety step I take is leaving my detailed trip itinerary with someone I trust. This includes my exact route, my planned campsites, and my “panic” time (the time they should call for help if they haven’t heard from me). In remote areas, I carry a satellite communicator like a Garmin inReach. This lets me send “I’m OK” messages or trigger an SOS signal if things go horribly wrong.
Common Questions I Get About Snow Camping
I’ve gathered a lot of questions over the years. Here are my answers to the most common ones.
How do you stay warm at night?
This is a multi-part answer. First, you have to eat a big, hot meal right before bed. Your body’s metabolism is a furnace, so you need to give it fuel to burn. Second, do some light exercise, like jumping jacks, right before you get in your sleeping bag. You want to be warm when you get in, but not sweaty. Third, if you have to pee in the middle of the night, go. Your body wastes a huge amount of energy keeping that liquid warm. I also fill up my Hydro Flask or a Nalgene bottle with boiling water, stick it in a sock, and put it in my sleeping bag as a personal heater.
How do you keep your batteries and electronics from dying?
Cold is the enemy of batteries. Never leave your phone, headlamp, or camera in your pack overnight. I sleep with all my electronics inside my sleeping bag with me. I keep my spare batteries in a chest pocket or a pants pocket, close to my body, during the day. This simple trick makes a massive difference in battery life.
How do you go to the bathroom in the snow?
This is the one nobody likes to talk about, but it’s important. For peeing, it’s pretty simple, though you’ll want to do it away from camp. Many people (men and women) use a dedicated “pee bottle” in the tent at night so they don’t have to go outside. For solid waste, all the same Leave No Trace principles apply. You need to dig a cathole 6-8 inches deep, which can be tough in frozen ground. Or, in some sensitive alpine areas, you are required to pack it all out using a WAG bag or portable toilet system.
What’s the biggest mistake beginners make?
I see two big ones. The first is underestimating the cold and bringing three-season gear, just like I did. The second, and perhaps more dangerous, is not understanding the snow. They see a steep, snow-covered slope and just try to walk across it, don’t recognize it as a high-consequence fall hazard, and then they don’t have an ice axe, or if they do, they don’t know how to use it. They’re just one slip away from a disaster.
One Big Mistake to Avoid on Any Snow Trip
Here’s a final piece of advice, a “don’t” that I want to emphasize. Don’t trust firm morning snow. When you start hiking early, the snow is often frozen solid and crunchy. It feels secure, and you make great time. The mistake is assuming it will be the same way on your hike back.
As the spring sun beats down, that “firm” snow turns to mush. What was an easy walk in the morning becomes a thigh-deep postholing nightmare in the afternoon. Worse, icy slopes can become dangerously slick as the top layer melts. And on big mountain slopes, the warming snow is a primary trigger for avalanches. Always be aware of how the conditions are changing throughout the day.
My Final Thoughts on Winter Adventure
Winter backpacking and snow hiking have given me some of the most profound and beautiful moments of my life. The silence of a snow-covered forest is something you just have to experience. But it’s an adventure that demands preparation and humility. You can’t cut corners on gear, and you can’t fake the skills.
Invest in your safety. Practice with your tools. Respect the weather. If you do, you’ll be rewarded with an entirely new and incredible way to experience the wild.
About the author
Cap Puckhaber is a marketing strategist, finance writer, and outdoor enthusiast. He writes across CapPuckhaber.com, TheHikingAdventures.com, SimpleFinanceBlog.com, and BlackDiamondMarketingSolutions.com. Follow him for honest, real-world advice backed by 20+ years of experience.
A Hiker’s Guide to Winter Traction and Safety
Backcountry Snowboarding Guide
Hiking and Backpacking Clothing Guide
Join our Mailing List
Sign up with us now and be the first one to know about our exclusive offers and product updates.
By submitting your information, you`re giving us permission to email you. You may unsubscribe at any time.


Follow Cap Puckhaber on Social Media


About the Author: Cap Puckhaber
Backpacker, Marketer, Investor, Blogger, Husband, Dog-Dad, Golfer, Snowboarder
Cap Puckhaber is a marketing strategist, finance writer, and outdoor enthusiast from Reno, Nevada. He writes across CapPuckhaber.com, TheHikingAdventures.com, SimpleFinanceBlog.com, and BlackDiamondMarketingSolutions.com.
Follow him for honest, real-world advice backed by 20+ years of experience.