
The Ultimate Wonderland Trail Guide
By Cap Puckhaber, Reno, Nevada
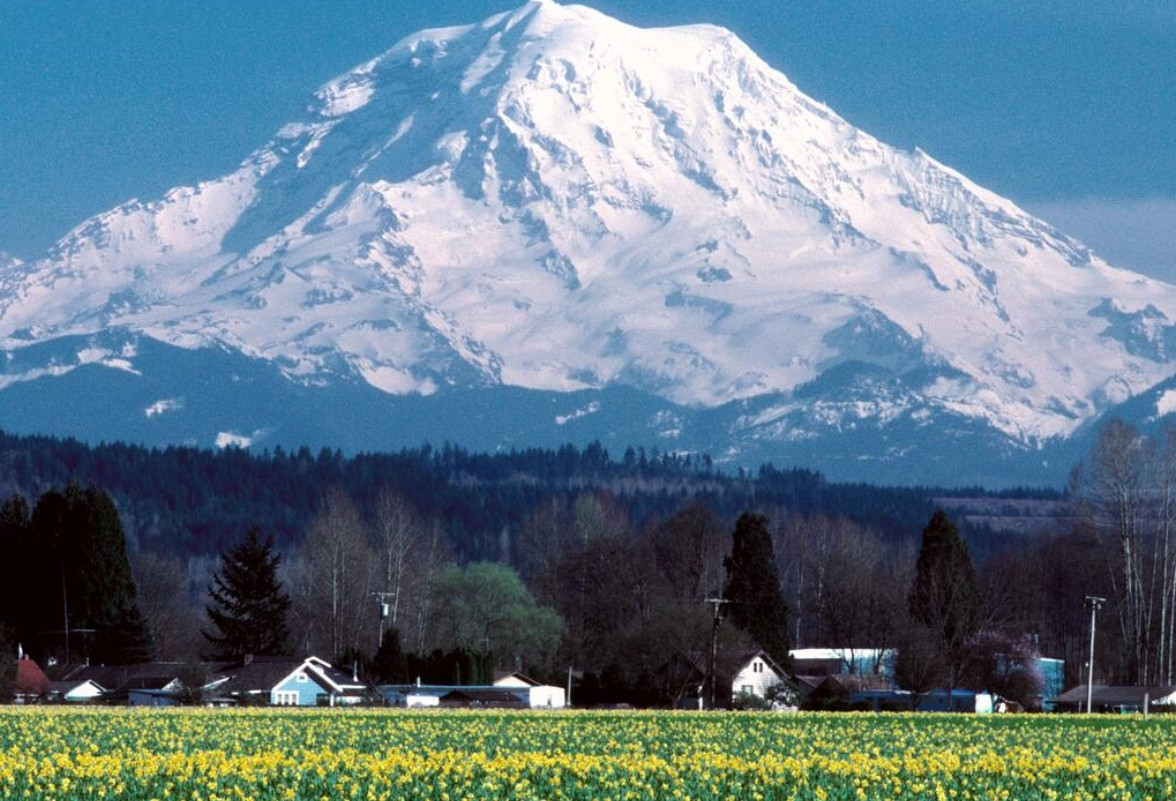
The wonderland trail is one of the most majestic hikes in the world. Whether you’re doing a through hike or section hiking, there is so much to offer. From mountain views, prairies, streams, rivers and timber forests, you need to be prepared. The permit process, mapping out your route, gear and food planning is a herculean effort. I’m Cap Puckhaber from TheHikingAdventures.com, and I know how overwhelming that initial planning stage can feel. You’re staring at a 93-mile loop with over 22,000 feet of elevation gain. The very first hurdle isn’t the trail itself it’s the infamous permit lottery. We’re going to break down this journey step-by-step. This guide to mastering the Wonderland Trail will transform that Herculean effort into a successful, memory-making adventure.
This trek takes you around a massive, active volcano. You’ll experience an incredibly diverse range of ecosystems every single day. One moment you might be hiking through a dense, wet, old-growth timber forest in a deep river valley. The next, you’re cresting a ridge above the tree line into a sunny alpine prairie. That incredible variety is why this trail holds such a legendary spot in the hearts of backpackers. Planning this trip is a puzzle. Once you put the pieces together the permits, the itinerary, the food caches you’ll be ready for a truly profound experience. We aren’t going to skip any of the tough questions either. We’ll talk about what to do if you don’t win the lottery. We will also explain why training your knees is more important than training for altitude.
The Herculean Effort of Securing Your Wonderland Permit
Getting a permit for the Wonderland Trail is notoriously difficult. It often feels more like winning the lottery than planning a hike. The demand for overnight wilderness permits in Mount Rainier National Park far exceeds the supply of designated campsites. This scarcity means you really need a proactive strategy. The park is very clear about when and how you can apply. I personally know hikers who apply for years before finally getting a winning time slot. Don’t feel bad if it takes you a while. It’s all part of the process, and persistence really pays off in this permit game.
The Brutal Numbers: Why This Permit is So Hard to Get
Let me explain exactly why this is such a tough permit to secure. The trail is structured around designated backcountry camps. The National Park Service (NPS) tightly controls the number of people staying at each one every night. The permit you receive is actually a chain of individual campsite reservations for your specific itinerary. If just one camp along your 93-mile route is already booked for a single night, your entire itinerary is invalid. It’s like trying to link a string of eight specific pearls. If even one is missing, the whole necklace falls apart. Most hikers want to hike during the prime window of late July through August. That’s when the snow is mostly gone and the weather is at its best. This funnels thousands of people into a very small timeframe, driving competition sky-high.
Playing the Game: Early Access vs. General Access
The entire process begins with the Early Access Lottery application window. This usually runs from early to mid-February. This is your main shot at the trail. If you and your friends can all apply individually, you multiply your group’s overall chances of securing one of the coveted time slots. If you win, you receive an assigned date and time in late March to book your full itinerary. You get to book before most other people get a chance. This period is when approximately two-thirds of the total reservable permits are claimed. Having your detailed itinerary mapped out well in advance of this time slot is non-negotiable. You’ll need to make split-second decisions about alternate camps if your first choices are gone. If you miss out on the Early Access period, you still have the General Access Date in late April, but the choices are obviously much, much slimmer then.
The Hail Mary: Walk-Up Permits and Cancellations
If you completely miss out on both the Early and General Access periods, don’t despair. There are still two avenues to look at for a successful trip. One-third of the total backcountry quota is held back for walk-up permits. These are issued the day before or the day of a planned start date at the various wilderness centers like Longmire or White River. This requires you to be physically present and extremely flexible. You must be ready to take any combination of sites that are available. Another option is simply checking the Recreation.gov website constantly in the weeks leading up to your desired start time. People cancel all the time, particularly 7−30 days out. A canceled itinerary often pops back into the system. This provides a perfect opening for you to snag a full, last-minute permit. You can also monitor the official Mount Rainier National Park wilderness permit page for the most current information.
What Makes the Wonderland Trail So Hard? (It’s Not Altitude)
When folks hear about a mountain trail, they often think of extreme elevation and altitude sickness. This happens especially if they’ve looked into something like Kilimanjaro. Here’s the thing: the Wonderland Trail is almost entirely below 7,000 feet. You’ll be breathing easy the whole time. However, don’t let that low elevation fool you. The challenge here is the relentless, daily vertical mileage that absolutely destroys your legs. It is a grueling, non-technical test of endurance. It will push your backpacking limits.
The Treadmill Effect: Relentless Up and Down
Unlike many other trails that climb once to a high pass and stay there, the Wonderland Trail is a continuous loop. It must descend to every major river drainage—like the Carbon River, the Mowich River, or the Nisqually. Then it immediately climbs back out to the next ridge. This means you will face multiple 2,000 to 4,000-foot ascents and descents every single day. My own lived experience tells me this repeated 500-foot-per-mile climb and descent profile is where the true difficulty lies. It’s not just the total 25,000 feet of elevation gain. It’s the fact that you have to grind it out day after day after day. A lot of thru-hikers who have done massive trails find the Wonderland Trail to be mile-for-mile one of the most physically strenuous because of this never-ending cycle of climbing and dropping.
Training Your Legs to Love the Pain
Since the trail’s biggest difficulty is its vertical profile, your training must focus on preparing your quads and knees for the continuous punishment. If you can, you should be doing hikes with a full pack that emulate the Wonderland’s daily grind. Aim for 3,000–4,000 feet of gain and loss over 10–15 miles. If you live somewhere flat, you need to get creative. Find a stadium, a stair-stepper machine, or even a local high-rise building. Dedicate hours to weighted stair climbing. This builds the muscle memory for the grind. It also helps you learn how your body handles sustained work. Furthermore, you need to practice hiking with your actual gear. Stop by an REI store or check their website for gear shakedowns and advice. A lighter pack is the absolute best form of training for the Wonderland Trail. Every ounce you save translates directly into less vertical work for your legs.
When to Hike: Dodging Bugs and Smoke
One of the questions that comes up most often when planning is, “When is the absolute best time to go?” The ideal window is always a trade-off between snow, wildflowers, bugs, and smoke. The earliest you’ll typically see the trail fully melted out is late July. That’s when the wildflowers start to pop. The downside? Late July is peak bug season. Hiker reports frequently warn that marshy areas like Devil’s Dream and the campsites around Golden Lake can be absolutely swarming with relentless mosquitoes. If you plan to go during this period, pack permethrin-treated clothing and a head net.
Conversely, if you wait until August or early September, you minimize the bug problem. The snow is guaranteed to be gone. However, this later timing carries a significantly increased risk of wildfire smoke drifting in from other parts of Washington, Oregon, or Canada. Wildfire smoke can quickly obscure the stunning views. It can also cause major respiratory issues. If your trip is all about the spectacular views of Mount Rainier, I generally suggest targeting mid-August for the best balance. Always check the air quality forecasts before you leave.
Mapping Your Route: Crafting the Perfect Itinerary
Mapping out your route for the Wonderland Trail is the second major challenge after securing the permit. The park service has a useful map. Planning the specific mileage, camp-to-camp logistics, and resupply points is where the herculean effort really begins. Most people take between 7 and 14 days. The majority of planned itineraries aim for 9 days and 8 nights. This balances daily challenge with sufficient time to enjoy the scenery. My philosophy is to plan for slightly shorter days early in the trip. That’s when your pack is heaviest and you’re still getting used to the relentless climbing.
Clockwise or Counter-Clockwise? An Honest Assessment
There is a long-running, mild contradiction in the hiking community about which direction clockwise or counter-clockwise is easier. Rumor suggests that clockwise is more sought after because the climbs might be slightly less steep. Let me explain why this might not actually matter for your permit success. From a logistical standpoint, the permit system is so competitive and finely balanced that going counter-clockwise doesn’t give you a meaningful advantage in snagging sites. The sites are tough to get either way.
The real difference is the nature of the first couple of days. If you start at a popular spot like Longmire going clockwise, you hit the most famous sections earlier. If you start at a less common trailhead like Box Canyon going counter-clockwise, you can put in miles on less-trafficked trail sections. This gives your body a chance to acclimate before you hit the really huge climbs. Focus on creating an itinerary that is balanced for your fitness level. Don’t focus on which direction is “easier.”
Choosing Your Start: Avoiding the Crowds
The starting trailhead is a key component of your permit application. The most popular places to start are typically Longmire and White River. They are simply the easiest to access from major population centers. They also have good parking and facilities. However, if you are struggling to piece together an itinerary, a good strategy is to look at the less popular trailheads. The hiking community frequently mentions Box Canyon as a fine starting point. It is significantly less competitive for permits. Starting there can simplify your permit success. It also positions your resupply points logically around the loop. You should always be willing to consider the full loop’s potential access points, including Mowich Lake. They provide strategic flexibility for a successful through-hike.
The Day-by-Day Logistics: Mileage and Flow
When planning your itinerary, don’t make the mistake of assuming your typical hiking pace applies here. The difficulty of the terrain—the rocks, roots, and steep, relentless grade—means you’ll move slower than you do on flatter trails. A good starting point for a 9-day itinerary is to aim for about 10–12 miles per day. Make sure you mix in a big elevation day. For example, many hikers plan their first couple of days to be short, around 8 miles. This lets them get used to the weight of their full pack and the climb profile. You have to be realistic about the vertical work. A 10-mile day on the Wonderland Trail with 3,500 feet of gain can feel harder than a 20-mile day on a gentler trail.
Trail Life: Campsites, Water, and Resupply Strategy
The day-to-day life on the Wonderland Trail is challenging but incredibly rewarding. The park has done an excellent job of maintaining the trail. They provide essential backcountry infrastructure at every designated camp. You’ll find pit toilets and bear poles at almost all sites. This is a fantastic convenience. However, you still need to be a proactive planner. This applies to the necessities of food, water, and dealing with the less desirable aspects of trail life.
The Good, the Bad, and the Buggy Camps
Choosing the right camp makes a huge difference in your enjoyment. Camps like Indian Bar and Summerland are highly sought after for a reason. Their views and general surroundings are truly majestic. They offer stunning mountain vistas and gorgeous wildflower meadows. Securing one of these camps is often the centerpiece of a successful itinerary. However, you need to be aware of the “bad” camps too, so you can plan accordingly. As mentioned, Devil’s Dream is infamous for its excessive bug pressure due to nearby marshy lakes. This sometimes forces hikers into their tents early. Another camp that comes with a warning is South Mowich River. Hikers have reported issues with mice there. This means your food storage needs to be absolutely perfect, even when using the provided bear poles. It’s always smart to check the latest trail conditions and hiker reports on a resource like the National Park Service (NPS) website before you head out.
Food Caching: The Ultimate Time Saver
A successful Wonderland Trail through-hike is defined by smart resupply planning. Carrying 7 to 14 days of food on your back is simply too heavy. Your resupply strategy, or food caching, is where a lot of the initial planning effort goes. The NPS has specific rules for this. You must package your food in a hard-sided container, like a 5-gallon bucket. Clearly label it with your permit information and intended pick-up date.
The two main operational cache locations are Longmire Wilderness Information Center and White River Campground. The essential tip here is that Longmire is the only location along the entire route where you can both cache your food and buy fuel for your stove. Many new hikers miss this fact. This makes Longmire a critical logistical stop. It is especially important if you plan to carry less fuel to reduce weight. You absolutely must mail your caches at least 2 weeks before your scheduled pick-up date. This gives the park service enough time to sort and safely store everything before you arrive.
Water Crossings: Getting Your Feet Wet (or Not)
The trail’s continuous ascents and descents are dictated by the major glacial-fed rivers and streams flowing off Mount Rainier. These crossings are another area where preparation is absolutely vital. The trail crews do an amazing job maintaining bridges over most of the major obstacles. For example, the Tahoma Creek Suspension Bridge is an iconic and thrilling crossing that keeps your feet dry. However, the sheer volume of water can wash out smaller bridges or sections of the trail. This happens particularly during the late July snowmelt.
When a crossing is unbridged or the bridge is out, you will face an open ford across a fast-moving, glacier-fed river. This is where you need to be the most proactive about safety. Use trekking poles for stability. Unbuckle your pack’s hip belt and sternum strap so you can quickly shed your pack if you fall. Cross early in the morning before the afternoon heat has significantly increased the flow of snowmelt. Never attempt a crossing that feels unsafe.
Essential Gear and Safety (Cap Puckhaber’s Trail-Tested Advice)
It’s time to talk about gear. For a hike of this magnitude, every single ounce in your pack feels like a pound on those relentless 4,000-foot climbs. My gear philosophy is simple: lightweight and reliable. This is not the trip to test out brand-new, unproven equipment. You need to ensure every item, from your tent to your water filter, has been tried, tested, and trusted on previous long hikes.
The Gear Philosophy: Lightweight and Reliable
Since your success hinges on minimizing the herculean effort of vertical travel, your base weight should be as low as possible. Base weight is the weight of your pack without food, water, or fuel. A lighter pack not only makes the climbs easier. It also puts less stress on your knees during the brutal descents. That’s where many hikers suffer. Focus on the big three: your tent, sleeping bag, and backpack. Consider a high-quality water filter like the Sawyer Squeeze or the Katadyn BeFree. Mount Rainier has abundant, clean water sources. You rarely need to carry more than a liter at a time, saving you weight. For clothing, a lightweight synthetic or wool baselayer, a high-quality waterproof shell, and a down jacket are all you need. This setup will handle the wide range of weather conditions this mountain throws at you. You can find detailed, lightweight gear checklists on popular hiking sites like The Trek to help you reduce your pack weight.
Staying Safe: Understanding Objective Hazards
Hiking the Wonderland Trail is an immersion in a true wilderness setting. This requires respect and preparedness. The primary objective hazards are not other hikers; they are the mountain itself. Weather is the biggest wildcard. Conditions can change from sunny and warm to hail, sleet, or whiteout snow in a matter of hours, even in August. You need to carry the Ten Essentials for Mount Rainier National Park. You also need to know how to use all of them. This means navigation tools (map and compass, plus a GPS device), a headlamp, first-aid supplies, and an emergency shelter.
Another major hazard is wildlife, particularly bears. While they are usually shy, you must strictly adhere to the park’s rules for food storage. Do this by using the provided bear poles or lockers at all designated campsites. This is a common-sense safety measure. It ensures you don’t attract unwanted visitors to your camp. Always have an emergency plan. Share your itinerary with someone who is not on the trail with you.
The True Cost of the Wonderland Trail
Many aspiring Wonderland hikers wonder about the real investment required. It’s not just about the trail itself. The cost extends beyond the initial 6 application fee and the 2 per-person, per-night fee that the park charges. You also have to factor in the costs of logistics and gear. For a first-timer, this can include 50-100 for resupply shipping. It could also mean potentially hundreds of dollars on specialized lightweight gear to keep your pack manageable. Travel costs to get to Mount Rainier National Park must also be factored in. Realistically, the time commitment—10 to 14 days off work—is often the biggest cost for people. However, when you weigh this against the once-in-a-lifetime views and the sheer accomplishment, it’s an investment that pays dividends in memories and personal achievement.
Final Thoughts on the Wonderland Adventure
The Wonderland Trail is, without question, one of the most rewarding and visually stunning multi-day hikes in North America. It is a true test of fitness, logistical planning, and mental stamina. It’s a trek that simultaneously intimidates and inspires. It often feels like a mild contradiction. You’re surrounded by majesty, but you’re often focused entirely on your next five steps. But the feeling you get when you finally complete that circuit is amazing. You realize your own physical and mental strength carried you through. That is an unparalleled accomplishment. My advice? Embrace the difficulty. Meticulously plan the logistics—especially the permit and food caches. Remember to look up at that massive, glacier-covered volcano every single day. The majesty of Mount Rainier is the reward. It makes all the herculean effort of planning and preparation completely worthwhile. Happy trails!
About the author
Cap Puckhaber is a marketing strategist, finance writer, and outdoor enthusiast. He writes across CapPuckhaber.com, TheHikingAdventures.com, SimpleFinanceBlog.com, and BlackDiamondMarketingSolutions.com. Follow him for honest, real-world advice backed by 20+ years of experience.
The Ultimate Beginner’s Guide to Thru-Hiking
North Cascades National Park Guide
Join our Mailing List
Sign up with us now and be the first one to know about our exclusive offers and product updates.
By submitting your information, you`re giving us permission to email you. You may unsubscribe at any time.

Follow Cap Puckhaber on Social Media


About the Author: Cap Puckhaber
Backpacker, Marketer, Investor, Blogger, Husband, Dog-Dad, Golfer, Snowboarder
Cap Puckhaber is a marketing strategist, finance writer, and outdoor enthusiast from Reno, Nevada. He writes across CapPuckhaber.com, TheHikingAdventures.com, SimpleFinanceBlog.com, and BlackDiamondMarketingSolutions.com.
Follow him for honest, real-world advice backed by 20+ years of experience.