
Montana Hiking Guide | Cap Puckhaber
Welcome to my Montana Hiking Trail Guide, which covers my trip to Glacier National Park.
Glacier National Park Backpacking Loop Guide
Glacier National Park feels huge. When you see pictures of those towering mountains and those icy blue lakes, it is easy to think a trip like that is simply too massive, too serious, or too difficult for someone who is completely new to backpacking. Most people assume that kind of deep wilderness exploration is reserved only for hikers who have been doing this for decades. That is just a misconception we need to clear up right away, but I promise you. Over at thehikingadventures.com, we specialize in making huge, intimidating trips totally accessible. Helping everyone experience this park is my goal.
Why Glacier? My Gunsight Pass Experience
I planned a multi-day trip right through the middle of Glacier some time ago. I knew going in that the experience would easily become one of the most memorable hiking adventures I have ever had. This incredible park offers over seven hundred miles of trails. This gives visitors everything from easy afternoon strolls to full-scale, multi-day expeditions. My personal choice for this journey was the big Gunsight Pass to Lake Ellen Wilson to Sperry Glacier loop. Depending on the side trips you take, this route covers about thirty-five to forty miles. I decided four or five days was the absolute perfect amount of time. This schedule let me really enjoy the views and sights without needing to rush through the scenery like I was running some kind of race.
The Route’s Reward
The specific route connects stunning alpine passes, a few hidden glacial lakes, and valleys filled with active, wild animals. It is a physically demanding route. The sheer, unbelievable beauty is absolutely worth every single step and every ache. The route gives you a real taste of the wilderness, even far away from all the bumper-to-bumper crowds you will often find along Going-to-the-Sun Road. This detailed guide is going to tell you exactly how the trip went. I will cover how to manage the trickiest logistics, as well as a great alternative route in the Many Glacier area.
The Almighty Permit Puzzle: Taming Glacier’s Bureaucracy
Getting the permit is the single hardest logistical challenge of this entire adventure. You should not let that fact stop you, though, if it feels discouraging. Why? Because getting that permit is one hundred percent worth the initial frustration and all the extra planning.
Glacier requires all overnight backpackers to use designated backcountry campgrounds throughout the park. This regulated system means you absolutely must have a permit before you can set up your tent anywhere in the wilderness. Due to the park’s overwhelming popularity, they use both a lottery system and an advance reservation process. I strongly suggest you start by entering the backcountry lottery when it opens in the early spring, usually around March. Keep in mind that winning a spot in the lottery does not actually guarantee a permit. Instead, it simply allows you to book your itinerary weeks before the general public release day, which is a huge advantage.
Lottery and Walk-Up Options
If you don’t secure that initial lottery spot, please do not stress or give up on your plans. You can rely on the general public release day, which usually happens a few weeks after the lottery window closes. Then, there is the option of trying for a walk-up permit. Basically, these are permits saved and issued daily at ranger stations for trips starting the very next day. If you are someone who has a flexible schedule and can handle uncertainty, this can serve as a great backup plan. Be prepared to wake up early and potentially wait in line.
Final Permit Advice
Since demand is so consistently high, I always recommend that you prepare and research multiple itineraries in case you cannot get your first choice on release day. You have to be flexible. For the most authoritative and current information, make sure you check the official NPS Wilderness Camping Advance Reservations page. This is the only official source you should trust for that information.
My Glacier Loop: Gunsight Pass to Sperry—Where Mountain Goats Judge Your Snacks
The loop delivered spectacularly on both counts, as I was looking for both solitude and huge, dramatic views when I planned my trip.
I started my trip by flying into Kalispell’s Glacier Park International Airport (FCA). This airport is about forty minutes from the West Glacier entrance gate. Renting a car is definitely the easiest option. This is because the park’s limited shuttle system does not directly connect to every single loop trailhead you might use. For my specific itinerary, I parked at Lake McDonald Lodge. All the vehicle logistics were simple because the route circles right back toward that area in the end. A simple plan avoids unnecessary confusion and stress. Just know this one thing: if you are traveling in peak summer season, you absolutely must reserve lodging or parking shuttles early. Summer fills up incredibly fast, and there is no getting around that fact.
Camping Logistics on My Route
My trip covered thirty-five to forty miles over four days and three nights. This trek was demanding but highly rewarding. My first stop was Gunsight Lake Campground, which makes for a great first-night stop. It is tucked dramatically below immense cliffs. I remember having to cross a small creek just before arriving at the designated tent pads. My second night was at Lake Ellen Wilson Campground. This was my personal favorite place to sleep. The sunsets here, casting glowing pink light on the jagged ridges, were unbelievable. The whole place felt totally remote, like stepping straight into an old postcard.
Views that Stay With You
My last night was at Sperry Campground near the historic Sperry Chalet. This location served as a perfect base camp for the side trip I took up to Sperry Glacier on the fourth morning. This loop is famous for a reason. The absolute highlight is Gunsight Pass. The sweeping alpine views here are spectacular. You get close-up looks at Jackson Glacier from the top. We hiked through this exposed area well before noon. This precaution is important because afternoon thunderstorms are extremely common. Getting caught on an exposed pass in a storm is something you definitely want to avoid.
The quiet side highlights were also huge, like Lake Ellen Wilson. The lake is truly a hidden alpine gem surrounded by fortress-like, imposing ridges. I set up my Big Agnes Copper Spur UL2 tent right next to a flowing stream here. It was the perfect shelter against the cold night air.
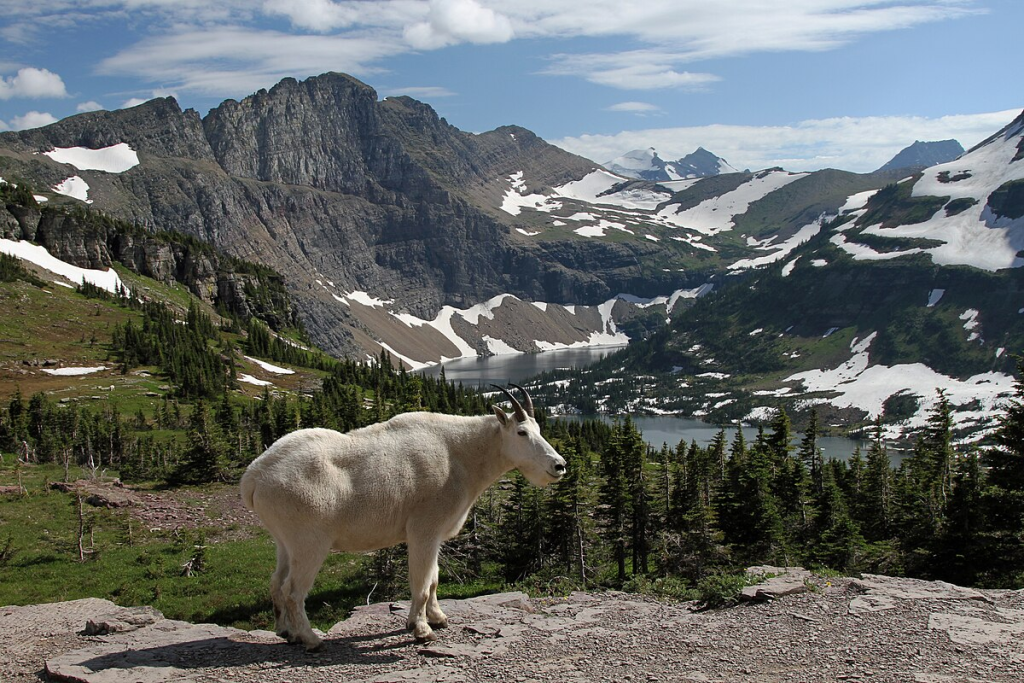
The wildlife was a constant reminder that I was a visitor in a serious place. I saw friendly mountain goats and chunky marmots, and I also saw plenty of bear sign, including large tracks and scat, along the trail. One peaceful evening at Gunsight Lake, I watched a black bear wander along the shoreline. This was a pretty intense reminder that good camping habits matter every single night.
If you love photography, sunrise at Ellen Wilson and sunset over Lake McDonald, viewed from the heights near Sperry, are absolute standouts. My final morning at Sperry, watching Lake McDonald glow in the early sunrise light, reminded me why I choose to spend all that time planning and chasing these challenging loops.
The Many Glacier Side Quest: Ptarmigan Tunnel, Red Gap, and Other Gems
When you are planning a trip to a massive park like Glacier, it really pays to look at all your different options. Looking at alternatives does not only prepare you better for the permit lottery. It also broadly expands your knowledge of the park. This gives you great options. The hiker completed a fantastic alternative route in the Many Glacier area. It is a slightly shorter option that every beginner should consider.
They hiked from the Iceberg or Ptarmigan Trailhead through a few famous lakes before finishing up at the Apikuni Trailhead. This loop is just as beautiful and demanding as the Gunsight Pass area. It requires a slightly different set of travel logistics to manage. This particular route covered approximately twenty-six miles over three days and two nights. This included a total elevation gain and loss of just under six thousand feet.
The Logistics Hurdle: Vehicle Reservations
Please note this essential rule: reservations are required to enter Many Glacier. Specifically, this required reservation can be a campground booking, a lodging reservation, a backcountry permit, or a specific road reservation. If you do not have any of those documents, you must enter the area either before six a.m. or after three p.m. without one. This is a truly crucial piece of planning, especially if you are a beginner hiker who likes to get an early start.
The other hiker who completed this route ended up two miles away from their original start point after they finished the trek. They had to hitchhike back to their parked car, but mentioned it was a non-issue and they got a ride within ten minutes. They even got a cold beer from the driver, which is a great, authentic experience. Since there are very few shuttles operating in the Many Glacier area, you must either plan a car drop the day before the hike or be prepared to put your thumb out on the road.
The Highlights of the Many Glacier Route
The beauty in this section of the park is truly spectacular. The scenery includes vast glacial basins and incredible rock formations in a striking shade of dark red.
- Ptarmigan Tunnel: This historic tunnel was fully completed back in 1930. It is officially listed on the National Register of Historic Places. The views you get from the top of the pass give you one of those first true, unforgettable jaw-drop moments of the trail.
- Elizabeth Lake Foot (ELF) Campground: This campsite sounds absolutely incredible. The colorful rocks found here are said to rival the famous photos of Lake McDonald. You get unparalleled seclusion and quiet all around you. The hikers who stayed here mentioned seeing Bald Eagles, Elk calling to each other in the valley, and a busy beaver swimming along the shore. That is a serious, authentic wilderness experience.
- Red Gap Pass: The final switchbacks leading up to this pass are demanding. They deliver some of the most beautiful views of the entire trip. The pass is aptly named “RED” Gap for the striking color of the rock formations and the soil.
Beginner Gear Deep Dive: Packing Like a Pro Who Still Gets Hungry
If you are a beginner, trying to figure out what gear to pack often feels like half the whole battle. There is so much information out there. There are also so many conflicting opinions from every direction. For the Gunsight Pass loop, I had a kit that was absolutely reliable. It is based on tried-and-true recommendations you can easily find on trusted sites like backpacking.com and from knowledgeable experts at REI.
The Big Four: Your Home on the Trail
You do not need the absolute lightest, most expensive gear, first. You definitely need gear that is dependable and storm-ready above all else. Think about it like buying a reliable, well-maintained used car instead of an expensive, flashy new sports car. It gets the job done perfectly without completely breaking your bank account.
- Shelter: I used a Big Agnes Copper Spur UL2 tent. This tent is lightweight and handles heavy, sustained rain like a total champion. You will be extremely happy for that reliability when an unexpected afternoon storm suddenly hits your camp.
- Sleep System: I paired a twenty-degree quilt with a sturdy Therm-a-Rest NeoAir pad. That pad is a crucial piece of gear. Getting a truly good night’s sleep on the cold, hard ground is the difference between having a great hiking day and having an absolutely miserable one. A twenty-degree quilt gives you enough wiggle room if the temperature unexpectedly drops dramatically.
- Footwear and Rain Gear: I wore Salomon Quest 4 GTX hiking boots. The serious ankle support they provide on rocky, steep descents is a must-have in a rugged park like Glacier. Your knees and ankles will thank you later for making that sensible decision. Reliable rain gear is non-negotiable for this environment. I packed a Patagonia Torrentshell jacket and lightweight rain pants. I strongly suggest you always have these items on the very top of your pack, where they are immediately accessible.
Navigation and Fueling
The main trails in Glacier are generally well-maintained and clearly marked, but things can go wrong extremely fast if you do not know exactly where you are. I used the Gaia GPS app on my phone, which is highly reliable. I always carried a physical National Geographic Glacier map as a critical backup. Remember, batteries die, but paper maps do not. You should always have both methods of navigation.
You absolutely need to fuel your body properly. This is one thing the other hiker wisely noted: they actually wished they had packed more food. I carried a mix of Peak Refuel dehydrated meals, nut butters, and salty jerky for solid trail fuel. You must pack more snacks than you think you need. Running out of food and feeling drained is a beginner mistake that immediately decreases your enjoyment while hiking. Pack plenty of performance gels and blocks to keep yourself hydrated and properly energized.
“Hey Bear!” The Only Rule You Can’t Break in Glacier
I cannot stress this point enough: Glacier National Park is serious grizzly bear country. This is not just a friendly forested park. You need to take bear safety extremely seriously. I am speaking from personal, lived experience here.
The fundamental rule you must follow is that your bear spray needs to be instantly accessible. I carried my bear spray in a specific holster that was strapped right to my pack’s shoulder strap. Not inside my pack. Not in a side pocket that is zipped up. It must be there, ready to go. Why? Because you simply do not have the time to dig around for it if you happen to surprise a grizzly or a protective mother bear.
Bear Safety Habits
Another major safety rule is making noise. I made a habit of calling out, “Hey bear!” every few minutes while hiking through dense brush or around blind corners. This simple action gives any nearby animals a crucial heads-up that a human is approaching. This usually prevents a terrifying surprise encounter. At camp, I watched that black bear wander along the shoreline at Gunsight Lake. That event reinforced the second major rule: never store food or anything scented inside your tent. To be clear, you must use the food-hanging poles or bear boxes provided at every single backcountry site. I always make sure that absolutely everything with a scent—food, trash, toothpaste, and even my dirty cooking pot—is stored securely away from where I am sleeping. You absolutely must follow park rules for food storage. Your life truly depends on it. I strongly recommend visiting outdoors.com to brush up on general wilderness safety and first aid procedures before you leave for your trip.
Sleet in July: Glacier’s Weather Swings and Water Strategies
The weather here is completely unpredictable. It is one of those places where you might be hiking comfortably in a light T-shirt at ten a.m. and suddenly pulling on a fleece and a heavy raincoat by noon. Layering up is the smart, professional, and necessary thing to do. On my trip, I did see blazing sun, cold rain, and sleet all in a single, twenty-four hour period. Dressing in layers is like having a perfectly organized toolkit of clothing. You peel them off quickly when you heat up, and you pile them on fast when the high pass gets seriously cold.
Water Filtration Basics
Water is plentiful on this loop, but I never drink untreated water under any circumstances. I carried a Katadyn BeFree filter for quick, easy fill-ups. I also used Aquamira drops at camp for treating larger bottles. Generally, most of the backcountry sites had reliable streams within a short walk. Later in the season, some smaller water sources absolutely dry up. This is an important piece of advice that the other hiker wisely offered: collect water at most stream crossings. Even in early July, many of the seasonal creeks were barely flowing. This made predicting the next reliable water source very difficult. Collecting water whenever you have the opportunity kept my mind at complete peace instead of stressing about running low on my supply.
Water Source Safety
As a final check before heading out, I always confirm water conditions with the rangers at the station. It is worth noting the other hiker’s experience at Poia Lake. They filled up their water bottles at the lakeshore. Unfortunately, they found a leech in their water filter when they checked it. They had to hike back a short distance to the lake outlet for all their future refills. This is a subtle but very important detail: moving water sources are generally much safer and cleaner than standing water.
Seasonal Concerns
It is important to check for current, local conditions before you start your trip. You should always check the park’s official site first. Other search sites like Yahoo will also report on wildfires and seasonal closures in the area. The Western states have been dealing with increasingly intense fire seasons lately. Heavy smoke can drastically change both the views and your overall experience. If heavy smoke is forecasted, it might be worth delaying your trip or switching to an itinerary in a different part of the park altogether. Always check the park’s official website for current alerts and closure information.
The Beginner’s Mindset: Tips I Wish I Knew Before Glacier
Both my own personal experience and the other hiker’s trip report highlighted a few key things we learned the hard way. These are incredibly helpful for all beginner hikers. These are the truly actionable tips that help you avoid common beginner mistakes. This makes your trip exponentially better than it would have been otherwise.
Actionable Tips for Better Hiking Habits
- Start Early: We both had a few late starts in the morning. This led directly to hot, miserable afternoons on exposed rocky trails. Start early so you cross the passes before noon. Then, you can relax and swim at the beautiful lakes instead of suffering under the sun.
- Collect Water Frequently: As I already mentioned, this is absolutely key to peace of mind in this park. We collected water at most stream crossings. This was necessary because we quickly realized many seasonal creeks were hardly flowing. This made it hard to confidently predict the next reliable water source.
- Research, Research, Research: Although I am the careful planner, I still took it upon myself to learn as much as possible about the trail and Glacier National Park in general. Research is an essential and non-skippable part of the journey. Specifically, check out Reddit’s backpacking and camping forums for niche, user-reported trail conditions. Official sites might be a little slow to update.
Regrets and Revisions
- Savor the Views: My last morning at Sperry, watching the lake glow, was one of those indelible moments. Similarly, the other hiker mentioned watching bald eagles and elk at Elizabeth Lake. Remember, backpacking in Glacier is not just about logging miles. It is truly about collecting those incredible moments that stay with you long after you have finally packed up camp and gone home.
- Leave No Trace: You must adhere strictly to Leave No Trace principles. This preserves the absolute wilderness feel of the park. Pack out everything you pack in.
- Pack More TP: This sounds small and trivial. The other hiker ran completely out of toilet paper on the last day. Pit toilets at each campground can lead you to be a little less frugal with your supply than you would normally be. Pack at least an extra roll. It is light, and it provides massive peace of mind when you need it most.
- Add a Day to an Alpine Lake: The other hiker wished they had added a day to their itinerary at Helen Lake. They saw it tucked into the mountains below Ahern Glacier. I wish I had budgeted a full recovery and relaxation day near Lake Ellen Wilson. Building in that kind of flexibility lets you savor the experience instead of rushing. Life is short. You should absolutely swim in the cold water! The other hiker loved having a swimsuit and a pack towel that dried quickly. That is a great lesson in prioritizing fun over rigid schedules.
- Spend More Time in Glacier: We were both simply not ready to leave the park. This was true even though we were extremely ready for a hot shower and a real bed. I recommend giving yourself at least one or two extra days on either end of the trip to explore more of the park, even if it is just a famous day hike like Avalanche Lake or Apgar Lookout.
Go Get Your Boots Dirty!
Glacier National Park is a majestic, beautiful, often unforgiving, and deeply rewarding place to visit. Do not let the intense permit process or the understandable fear of grizzly bears keep you away from this experience. Every single person who has ever hiked these huge mountains started with the same doubts and fears that you have right now. The huge difference is they took the time to plan, research, and commit to the journey.
This Gunsight Pass loop that I completed, or the alternative Red Gap Pass route, will truly reward you with some of the most dramatic, sweeping wilderness scenery in all of North America. Take all the advice I have given you. Then, head over to thehikingadventures.com for more detailed trip planning resources. Start making those reservations right now. If you are ready to commit to the necessary planning and permits, you will never regret the breathtaking view from the top of the pass.
What other national parks are currently on your list once you conquer Glacier? I would honestly love to hear all about your ambitious plans!
More Blogs from Cap Puckhaber

Follow Cap Puckhaber on Social Media

Cap Puckhaber
Backpacker, Marketer, Investor, Blogger, Husband, Dog-Dad, Golfer, Snowboarder
Cap Puckhaber is a marketing strategist, finance writer, and outdoor enthusiast from Reno, Nevada. He writes across CapPuckhaber.com, TheHikingAdventures.com, SimpleFinanceBlog.com, and BlackDiamondMarketingSolutions.com.
Follow him for honest, real-world advice backed by 20+ years of experience.